Table of Contents
Any% RTA - MSX Version
Finish the game as fast as possible playing the original MSX2 computer version of Metal Gear.
Route
This page is still considered work in progress.
Refer to PS2 Big Boss for the main gist of playing on “original difficulty”.
Key Points About the MSX Version
Key aspects are grabbing rations is included, no gas mask is used on high level any% runs (however it can help beginners).
Key is a MSX version specific glitch that reloads the room, which will duplicate items,
but for some reason will forget to load the electric floors properly so they get turned off.
Execute it with F1-F5-esc-F1.
When in a floor wide alert, guards can run after you into a room (so long as it is not one with a hostage).
However this is also the easiest way to get rid of a floor wide alert. Turn around and shoot / punch enough guards
to get rid of the floor wide alert. (5 need to be killed in total).
The MSX computer slows down massively during a big alert with all guards present on screen (4-5).
Try to avoid as many alerts as possible in order to avoid these slowdowns that will cost you time.
Building 1
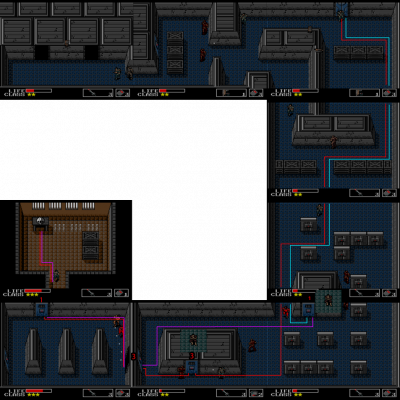
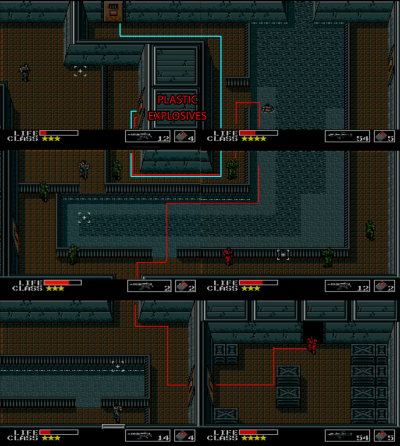
Building 1 - Ground Floor
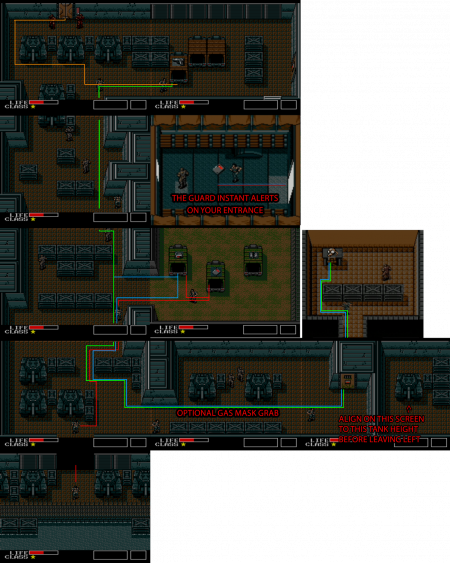
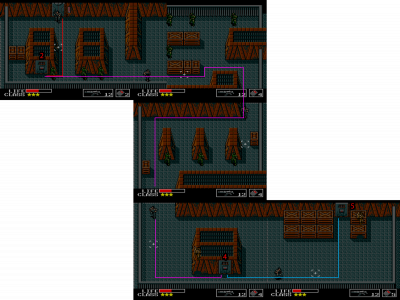
Grab Level 1 Card
follow red line on map
- Walk up, then hold right and go up next to the tank. Before leaving the screen walk right
- Hold up and walk right to meet the truck screen
- walk to the center truck first and grab the level 1 card, make sure to go up enough so the guard doesn't see you
- exit the truck, open the menu and close it again to have the level 1 card equipped
- walk left one screen
Optional: Grab gas mask
follow blue line on map
- walk south below the boxes and go left until you can punch the guard
- now you can leave south, since the guard is unable to alert on you
- walk south and leave the tank screen to the right
- walk right without pause until you meet the door
- inside the room grab the gas mask
Grab the Pistol
Before leaving the floor, grab the pistol in the top screen 2nd column.
The most left truck has the pistol. Return back to the top left screen to enter the elevator.
leaving ground floor
follow green line on map
- leave the room, walk south and exit to the left
- keep walking left until you hit the eastern most room
- walk to the northern most room
- OPTIONAL: wait until the guard shift changes
- enter the elevator
- take the elevator up (only one option)
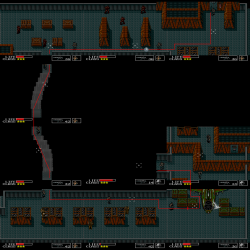
Building 1 - Floor 2
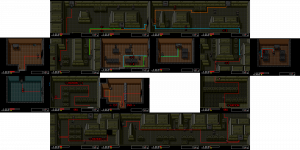
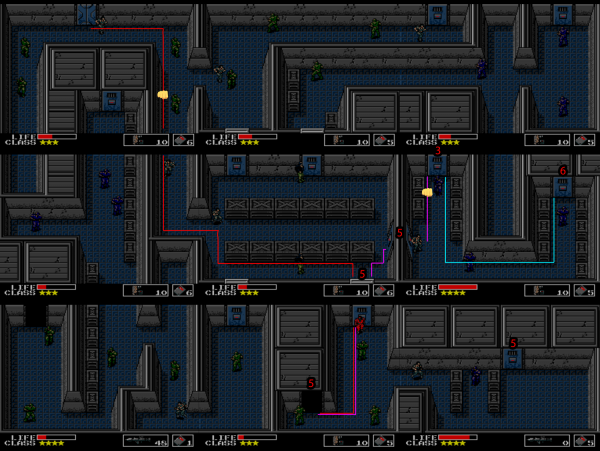
Click the image for full resolution view
The biggest floor in the entire speedrun. Let's break it down!
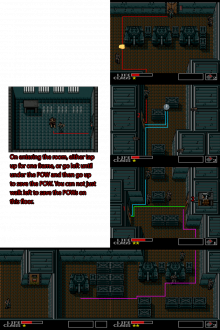
First Gas Room
- Hold down as you leave the elevator, turn left close to the wall and leave the room south
- hold down, then left close to the left side wall
- enter the door with level 1 card key, which you already have equipped
- on entering the room, turn right immediately and start punching until the floor wide alert drops
- grab the ammo box and get as many with the reload glitch as you want (50 shots in total are possible on class1)
- hold left, turn down close to the wall
- hold down and touch the hostage
- hold right to enter the gas room
- in the gas room walk up, then menu to the ration or use your gas mask
- walk close to the walls
- once the once your life is too low, use the ration in the menu
- unlike the PS2 version, in the MSX version you have to use the ration manually
- switch back to the level 1 door card
Death Barrel Room
- after the gas room, hold left
- get seen by the guard and turn down to kill the guard with a single shot
- this guard alert turns off the cameras so you won't get another floor wide alert
- enter the lower door to save the hostage
- leave the hostage room
- in the death barrel room hold up and go to the left gap
- grab the explosives
- walk down to the center again
- wait for the barrel to roll left
- once the barrel has rolled left, walk up and exit to the right
Grabbing Level 2 Card
- exiting the death barrel room, prepare to hold up and then right
- punch the top guard (only one) before he can see you
- if he sees you, it is another floor wide alert
- stay at the top wall when walking right, you won't touch the guards
- at the most bottom right screen, make sure to be seen by the guard, so the cameras turn off
- shoot the guard and get inside the right room to get the level 2 card
- on leaving, go left and punch the guard, then go up
Meeting 4 Horsemen
- walk through the electrified floor, turn off the damage with the reload glitch (F1 - F5 - ESC - F1)
- walk right to save the hostage, punch the guard on your way
- enter the hostage room up, then right, walk the same path out again
- once leaving the room, switch to the level 2 card
- follow the light blue line to get into the 4 horsemen room
- punch the top left guard before opening the door to avoid another full floor alert
Four Horsemen
- once in the 4 horsemen room, walk up to the centre, turn right
- Note: The Tas gets the silencer, while doing testing some situations can be saved by killing guards silently
To get the silencer you have to kill all four horsemen.
On pick up, the effect is immediately effective for the pistol and the smg. - on turning right, menu to the level 1 card
- walk right into the room to grab the grenade launcher, go down then left, leave the room
- back in the 4 horsemen room, switch to the level 2 card
- leave the room
Leaving 2F
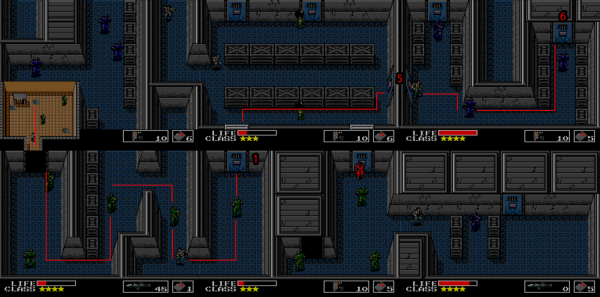
- follow the light green line to save the final hostage on this floor
- leave along the orange line and follow it to the top right elevator
- take the elevator down 2 floors
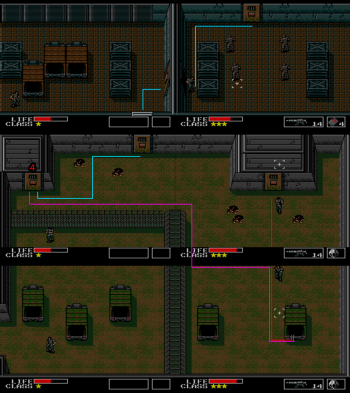
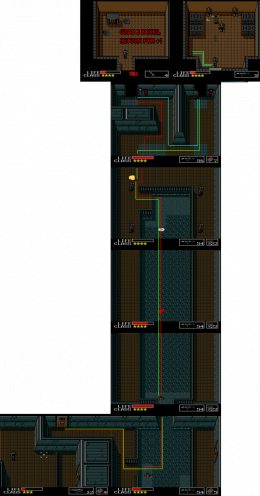
Building 1 - Ground Floor Capture
Key points: save 2 hostages, get submachine gun, get captured
click for full resolution
- walk south, curve the tanks to the left
- stick to the tanks and punch the left guard to have him not alert on you
- exit south by the left wall side
- enter the hostage room and hold left
- turn up when reaching the hostage to actually save them
- leave to the right, get behind the box (right side) and wait for the left camera to move high enough
- switch to level 1 door card
- once the camera is high enough, walk south, exit to the left side at the bottom
- walk to the left side door
- save the hostage, again hold left and up once reaching hostage
- leave the room, walk up and right, switch to level 2 door card
- enter the right side door
- grab the submachine gun, exit the room
- walk south and right before leaving the room
- stick to the tank going left, turn down as soon as the right guard looks south
- leave the room to the left to get captured
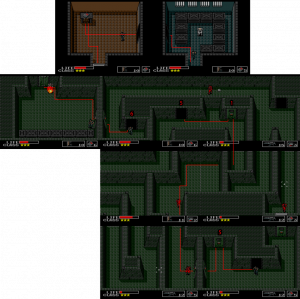
Building 1 - Underground
Escape the cell and rescue Gray Fox
- walk left into the wall
- punch 5 times to open the wall
- hold left and go down to touch Gray Fox at his left body half
- after the convo walk down and punch the wall 5 times again
- go right into the Shotmaker fight
Shotmaker
Ignore Shotmaker! (for now)
Escape Underground
- walk to the bottom right door and punch it
- walk down and right to grab your items
- menu as follows to remove the tracker and equip the door 2 key card
- walk out of the right room and enter the left room
- grab the door key level 3 card
- grab the ammunition
- leave the room and return to grab more ammunition
- in total: grab 5 ammo boxes, the result should be 5 explosives and 30 grenade launcher ammo
- before leaving the final time, menu to the door level 3 card and the submachine gun
Shotmaker
FIght Shotmaker!
- Walk immediately left and up the wall
- turn right and shoot shotmaker with the submachine gun
- he should die within 2 seconds
- equip the plastic explosives before leaving to the maze
- leave to the right into the maze
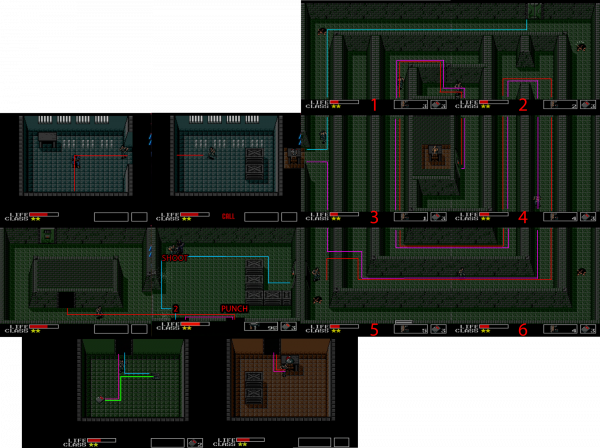
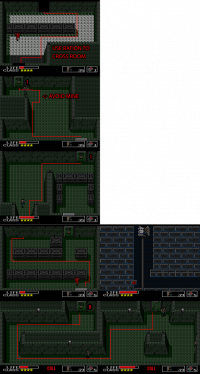
Maze
the maze is very simple, key points are to grab the blast suit and the enemy uniform.
Sadly the dogs are faster than on the PS2 port, so shooting them might be necessary.
- walk up, just above the door frame, and right to the marked wall, place 1 explosive
- YOU CAN STAND ON EXPLOSIVES, THEY WON'T DAMAGE YOU
- follow the line on the map to the top right corner, placing a bomb just after entering the room
- continue around, hugging the inner wall, and set another explosive on the small wall segment
- walk down, then right, then down, and into the blast suit room
- follow the path back again to the beginning and walk up
- just above the center of the screen, set an explosive on the left wall
- grab the enemy uniform and then leave the room
- the elevator is in the top right corner of the map
- equip the submachine gun before leaving
Building 1 - Floor 1
Meet Machine Gun Kid
- walk south and follow the line on the map
- trip the laser and floor wide alert by going south and then left
- keep going down and hold left
- enter the room to save another hostage
- walk left and use your door key level 3 to enter machine gun kid's room
Machine Gun Kid
- Ignore Machine Gun Kid
- At some point entering or exiting, a ration will most likely need to be used
Parachute and Hostage
- Walk up in the boss room and menu to the door card level 1
- walk up to grab the parachute and leave the machine gun kid boss room
- if close to death, tapping up during exit will avoid MGK's hitbox
- try to exit as quickly as possible to only get shot once by MGK
- walk up and then right in the next room to not alert the guard
- save the hostage and leave to the left going up
- with the laser traps trip the alert again with the center box
- before reaching the elevator menu to the blast suit and grenade launcher
Building 1 - Roof
Roof
- Walk south and left
- in the room with the three guards, wait south of the right block to not get spotted
- while you wait, menu to the parachute
- follow the path left and then south to go past the bridge section
- walk right and before entering the hind fight, walk south to be on the top right corner level of the box
- note: the roof alert is forced and unavoidable, with luck you can leave the screen without taking damage
Hind-D Fight
- Walk right and shoot 20 times with the grenade launcher
- once the last grenade has left the launcher you can keep holding right, no damage
- walk up and left to fall off the roof - MAKE SURE TO HAVE THE PARACHUTE EQUIPPED!!!
Building 1 - Ground Floor
Level 4 Key and Rank Up 2
- once landed walk south
- hold right to enter the truck - don't walk too far south or else you take mine explosion damage
- grab the level 4 card key
- leaving the truck hold left
- you WILL take damage from the mine explosion, make sure to have enough health before
- walk up, equip the newly acquired level 4 door key card
- enter the hostage room, get the 2nd rank up and leave the first building as the map guides
- you can reset the dogs back to the initial position by leaving to the right screen first, walk up further, then return to the left screen and go through the door
Damageless Minefield
For the cost of some seconds you can walk an easy enough line between the mines to avoid taking damage, thus letting you keep continue a run.
Building 1 to 2
grab explosives
- Immediately head left and enter the leftmost truck for explosives
- grab 3 explosives, so repeat entering the truck 3 times
- then leave the screen to the left and start walking up, you'll be wrapped around the level
- go up to the tank
Tank
- Walk to the right side of the tank
- walk up, punch or wait
- once shot, walk through the tank
Entering Building 2
- after passing the tank, go up and right until you're between the grenade launcher and ammo count
- switch to the uniform
- pass the guards
- DO NOT switch back to the level 4 card - you will get an alert that transfers into the Building 2 as well, slowing you down.
Building 2
Building 2 - Ground Floor - First Visit
Bulldozer
- Walk up to the bulldozer fight
- hold up to be close enough and send off 4 shots
- then walk to the south of the room before opening the door
- turn up and send off 4 more shots
- be aware if you go up while the bulldozer is exploding, the hitbox lasts a bit longer and you die on touch
- leave the boss room going up
Antenna
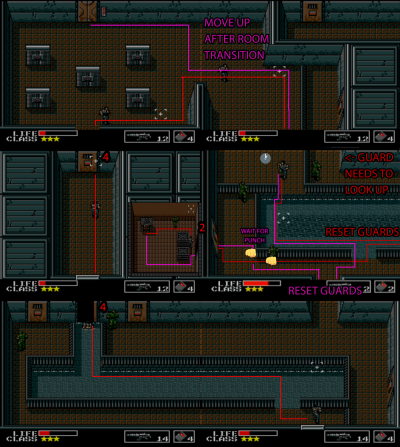
- Leave the bulldozer room immediately to the right, then up
- follow the path on the map to go to the Antenna room
- IMPORTANT in this room with three guards, the top right guard will immediately notice you, wait for him to look up on entering the room
- follow the line and reset the guards once going right and returning left
- punch the bottom guard, enter the room to the left when the left guard looks north
- before entering switch to the door level 2 key card
- grab the antenna by going up
- leave the room by walking south of the boxes to not alert the guard
- back to the 3 guards room, walk to the right until you're at the ledge
- punch the guard that's coming from the right (south one) and leave the room to the south
- return immediately up to reset the guards, follow the path north in the bright water
- when going up, turn left once you hit the corner wall
- in the room with the laser traps, walk north and then left, it'll time Snake so you won't trip the alert
- take the elevator up 2 levels
Building 2 - Roof
Welcome to Hell Roof, the alert is forced
Click the image for a full resolution view
- Walk south and rescue the hostage
- leaving the room walk right and equip the level 4 door card
- follow the path south to get to the room holding the level 5 door card
- if comfortable, go south then left on the middle screen for a faster but riskier route
- menu to the level 5 door card
- or right, then down twice
- leave the floor and take the elevator ALL THE WAY DOWN
Building 2 - Underground - First visit
- Walk left and rescue the hostage
- walk south and open the door
- either continue to the next room or menu before entering
- equip gas mask and explosives
- walk north and go to the spot at the wall
- place plastic explosive next to the wall and open it
- switch to level 1 door card
- go up and save the hostage
- walk east and equip the level 5 door card
- Ignore the fake Dr. Madnar
- walk left and in the next room grab the door level 6 card
- equip the door level 6 card
- exit and enter the left door to meet Fire Trooper
Fire Trooper
if you have enough health, you can ignore the fire trooper and walk past him going north, then east, enter the elevator
or
have the submachine gun equipped and walk up to FT, wait until the flames are off, then kill FT with the submachine gun
Take the elevator UP 2 Levels
Building 2 - Floor 2 - First Visit
Another more complex floor, lets break it down
Rank 4
Click the image for a full resolution view
- since on entering the floor the guards will immediately see you
- get ready to shoot the right guard and walk further right
- try to shoot the guard bottom right with a precise shot while avoiding bullets
- walk down and go right to the brads
- walk south and go right, keep hugging the boxes from the bottom
- now is the latest point to switch from door key level 6 to 5
- walk south east to save the hostage
- you can avoid getting spotted by doing clean lines close to the wall
- go back again to the brad rooms
- exit to the right
- before going up, menu to door key level 3
- punch the guard that is coming towards you to not trigger an alert
- enter the top left room, save the hostage and rank up the third time for rank 4
- leave to the south, in the next room don't walk straight away but punch the guard first to not trigger an alert
- walk right and punch the next guard, stick to the boxes and go up, punch the third guard and then enter the rocket launcher room
- press select, go to frequency 120.48, press up to call
- this will save Jennifer in your codec menu - LET THIS CALL PLAY OUT ENTIRELY OR THE ROCKET LAUNCHER WON'T SPAWN
- then L2 to equip door key level 6
- once outside menu to the rocket launcher and the door key level 5
Ammo Grab
click image for full resolution
- after you grabbed the rocket launcher, unlike in the PS2 version, we don't need to leave the floor
- walk back to the Brad room and take the bottom left door
- follow the red line into the most left room
- it contains two guards you have to get rid off
- grab enough ammo from the boxes with the reload glitch for both the Brad fights and the later game
- 14 rockets minimum - more are recommended
Brads
click image for full resolution
- coming from the ammo box room retrace your steps back to the Brad room
- each Brad takes 4 rockets to die
- on entering the Brad room, walk to the bottom wall (it has to be the furthest south) tap right and shoot 4 times
- once the first Brad is down, go top left to the top wall and shoot right 4 times
- once the 2nd Brad dies, the level 7 card key drops, grab it
Compass
- enter the top right door, follow to the top right room, stick to the northside wall
- in the three guard room, punch the left guard, then
- call Jennifer via the saved codec frequency, she will open the door
- LET THIS CALL PLAY OUT ENTIRELY OR THE DOOR WON'T OPEN
- follow to the top right door, punch the top guard and grab the compass
- on exiting the room, punch first before moving to take care of the top guard
- turn left and punch the left guard as well
- retrace back to the brad room, switch to level 5 card
- then return to the bottom right elevator again
- take the elevator down a SINGLE floor
Building 2 - Ground Floor - Second Visit
click image for full resolution
We're going to be leaving to the reach building 3, to grab the oxygen tank
Before that we have to replenish our missing plastic explosives.
- follow the red line on the map to get to the room that contains the plastic explosive
- use the reload glitch to grab enough to get to 20 PEs mininmum
- turn out and follow the blue line to leave building 2
- equip card 7 to leave building 2
- once you left the building, equip the compass
Desert to Building 3
click on image for full resolution
- you have to survive 4 screens of scorpions that can poison you
- you can use the SMG to shoot scorpions, start shooting as soon as you enter the desert to not get instantly poisoned
- to save ammunition, you can wrap around the screen to the left or the right to avoid scorpions
- once you reached the empty screen, you survived the first round of scorpions
- move snake to the horizontal line in the image, the goal is to enter the door on its right side
- then equip level 7 card and plastic explosives
- move up and walk straight up into the door
Building 3 - Ground Floor
The MSX pits open very fast compared to the PS2 port's version. There's only one line we can take to avoid the pits.
- enter the room and go top, walk right to blow up the wall
- Red line: you have to leave the room on the left hand side and walk up, left at the top of the boxes and then go into the elevator
- once the elevator starts moving down heal up and go to door card level 8
- follow the elevator all the way down
click image for full resolution
Underground - First Visit
let's grab the scuba gear
- walk south underneath the walk block and place a plastic explosive
- go into the room and grab the scuba gear
- leave back into the elevator again going up
click image for full resolution
Ground Floor - Second Visit
both PAL and NTSC/HDC
- after leaving the elevator, walk shortly left, then south to avoid the 1st pit
- reaching the box hold right and leave south to not fall into the 2nd pit
- leave the building 3 where you entered from
Desert to Building 2
See Desert to Building 3 for returning back. You do not need the compass equipped to return to building 2.
Building 2 - Second Visit
move to Coward Duck
- Once Building 2 has been entered, switch to scuba gear and RC Missile Launcher
- swim up north until the end of the path
- leaving the water, stay close to the top railing and move up where the railing begins (see map)
- use a RC Missile to take out the electric floor
- equip level 1 card and enter the top left room
- optionl: grab ammunition boxes if required, use the reload glitch to grab more without leaving the room
- before stepping on the electric floor use the reload glitch (F1 - F5 - Escape - F1) to turn off the damage from the floor
- equip the level 7 card and Rocket launcher
Coward Duck
- enter the room, skip the dialog and time your shots
- the best method is to hold skip and fire at the same time
- 2 shots from the rocket launcher and CD is dead
- grab the level 8 card while the 2nd rocket is still flying
- do not fall into the pit in the middle of the room
- before leaving the room, equip the RC missile
- then leave down again
Ending Building 2
- on leaving Dirty Duck's room use the reload glitch again to move past the electric floor
- equip the scuba gear before leaving south
- punch the top left guard directly after switching screens if necessary
- then hug the railing and swim south again to leave building 2
Desert to Building 3 - Second Trip
See above notes for Desert first trip
- remember to equip compass for the trip
- equip plastic explosives and level 7 card on the empty screen
Building 3 - Second Visit
Building 3 - Ground Floor
click for full resolution image
- leave the room going up, left, then up
- PS2 PAL ONLY (Blue line): you can keep walking north and sticking close to the north side boxes going to the elevator
- PS2 NTSC and HDC (Red line): you have to leave the room on the left hand side and walk up, left at the top of the boxes and then go into the elevator
- once in the elevator go down
- once the elevator starts moving go to door card level 8
- follow the elevator all the way down
Building 3 - Underground
click image for full resolution
- follow the path until you reach the level 8 door, open it and then switch to the gas mask
- place the explosive, continue to the next room
- walk up and hug the right side wall to not fall into the pit
- then equip card 1
- open the door, before leaving, equip the gas mask again
- pass through the next room, follow the line to not hit mines
- at the end, equip the level 1 card to open the door
- hold right to hug the wall, then switch to the ration before walking on the electric floor
- enter the Metal Gear TX-55 boss room, have the ration automatically used on the electric floor
Building 3 - TX-55
The order of legs to place the explosives in front of:
RRL, RLL, RLL, RRL, RLR, R
| 1 | Right | Right | Left |
|---|---|---|---|
| 2 | Right | Left | Left |
| 3 | Right | Left | Left |
| 4 | Right | Right | Left |
| 5 | Right | Left | Right |
| 6 | Right |
Do NOT menu to the rocket launcher before the last explosive has gone off or the explosive will despawn.
In order to not get hit from the lasers, walk from left to right and right to left and place an explosive down
when you reach the leg you want to hit. See the current runs for reference.
Building 3 - Big Boss & Escape
click image for full resolution
- walk up and turn left
- shoot the first rocket on your way to the 2nd box, bottom left corner
- shoot a 2nd rocket at that bottom right corner of the box
- then move to the top right corner of that center box
- shoot 2 more rockets to the left
- Big Boss is dead
- move out of the room
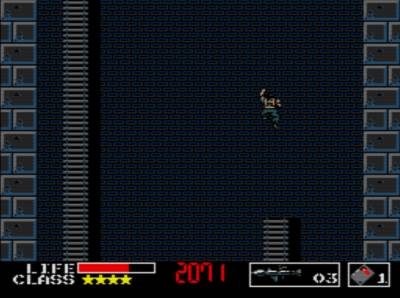
- walk up the most left ladder
- alternative: try the Spider-Snake where you take the right ladder and climb it the most left alignment possible:
