Table of Contents
Big Shell: Pre-Stillman
Take “Snake”? and head to towards the elevator and eventually to Strut B Transformer Room.
Strut A Deep Sea Dock
As soon as you gain control, cartwheel up the stairs and open the hatch.
Skip the cutscene then continue moving forward.
After the cutscene, use the node. This is a good opprutunity to make sure you selected the correct such as having previous switched on.
When you're done with the node, head south-east to the unconcious guard. When the guard wakes up, grab him then let go of him and punch him in his groin.
Stand in your position until a guard near the elevator comes to investigate you. After that, hide in the middle.
Once the guard on the right has walked by, knock on the wall to attract the left guard.
Go right then into the elevator.
Strut A Roof
Go underneath the cut fence to the left side and head to the door that takes you to the Strut A Pump Room.
Strut A Pump Room
Head towards the AB Connecting Bridge.
AB Connecting Bridge
Head south and cartwheel over the noisy floors to prevent the guard from hearing it. Cartwheel into him then head into the Strut B Transformer Room.
- <html><span style=“color:Cyan”>Rank 1 (Risky):</span> Head south and cartwheel over the first noisy floor. Then catch his attention by walking over the second. Cartwheel into him then head into the Strut B Transformer Room. <br></html>
- <html><span style=“color:Orange”>GOID:</span> Head north and cartwheel over the noisy floors tp prevent the guard from hearing it. Cartwheel into him then head into the Strut B Transformer Room. <br></html>
Strut B Transformer Room
Move left and cartwheel into the cutscene. After the cutscene, head north and through the door. Answer the codec as early as possible and then cartwheel into the door that leads you into the BC Connecting Bridge.
BC Connecting Bridge
Head north to Strut C. Avoid picking up the Chaff Grenades as picking it up later is slightly faster for menus.
Strut C Dining Hall
Head north into towards the trigger for the Stillman cutscene.
- <html><span style=“color:SandyBrown”>NG:</span> The cutscenes explaining how to use the Coolant Spray and Sensor A are unskippable, resulting in several minutes of timeloss. Avoid playing on this option.<br></html>
- <html><span style=“color:SandyBrown”>NG+ and NG++:</span> The cutscenes explaining how to use the Coolant Spray and Sensor A are skippable.<br></html>
Big Shell: Bomb Disposal Segment (Part 1)
This guide will showcase the Conveyor Belt Route for the bomb disposal segment, as it is faster than the traditional counter-clockwise route.
A dedicated section will be made for the Counter-Clockwise Bomb Disposal route.
- <html><span style=“color:Aquamarine”>Sons Of Liberty (USA / NTSC):</span> Conveyor Belt Route does NOT work. You must do the Counter-Clockwise route instead. <br></html>
Note: This guide will show many Chaff Grenade related strategies for this segment. However, only choose 2 of them as you will need the additional Chaff Grenades later in the run.
Strut C Dining Hall
Head towards the woman's bathroom. While cartwheeling, prepare your menus by equipping the Coolant Spray then the Socom.
When you approach the guard, turn around him to avoid getting spotted. Diffuse the bomb from as far away as possible.
As you leave, fire a warning shot to avoid getting shot by the guard.
- <html><span style=“color:Cyan”>Rank 1 (Risky):</span> Similar to the strategy above, but instead of turning around the guard, hold him up. As you leave, fire two spaced-out shots into the guard to avoid the alert.<br></html>
BC Connecting Bridge
Fire 3 bullets with the Socom into the cypher and pickup the Chaff Grenades before leaving to the door in the south.
Strut B Transformer Room
AB Connecting Bridge
Take the bottom side as the guard spots you. Keep to the right-hand side of the guard and cartwheel to have him fall over the railing.
- <html><span style=“color:Cyan”>Rank 1:</span> The guard falling down into the ocean does NOT count as a kill. If the other guard spots you, it is best to shoot out his radio to prevent a transition Alert.<br></html>
Strut A Pump Room
Head to the stairs on the left and through the door to the Strut A Roof.
Strut A Roof
- Cartwheel Strategy: Head towards the guard and hold him up followed by a cartwheel into him. The cartwheel should make him face away from Raiden when he gets up. Diffuse the bomb then leave to the right door.
- Quick KO Strategy: Head towards the guard and do a quick K.O from his left-side. Diffuse the bomb then leave to the right door.
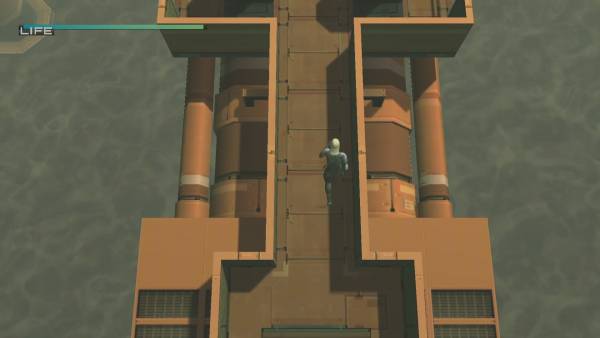
Note: The bomb is placed behind a fence on the south-east section of the room. See image below:
Strut A Pump Room
Note: You MUST pick up the box here if you plan on doing Conveyor Belt Route.
FA Connecting Bridge
There's two strategies usually used here:
- Chaff Strategy: Throw a chaff grenade.
- Socom Strategy: Fire 3 bullets with the Socom into the cypher and then shoot out the radio of the guard.
Head through the top floor door to Strut F.
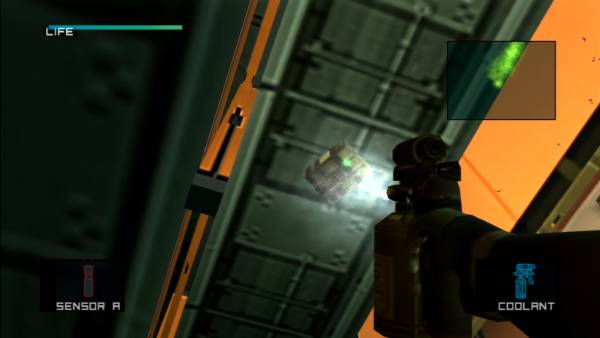
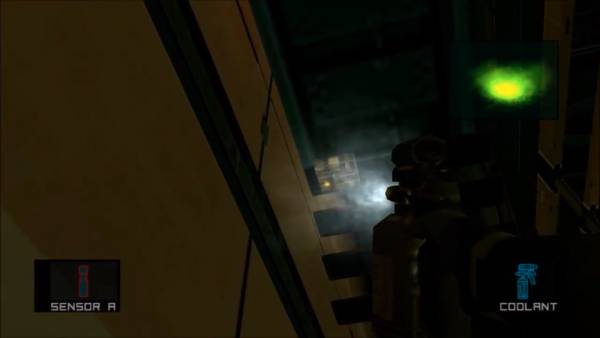
Strut F Warehouse
From the start of the room, toss a Chaff Grenade as you head to the room on the right side to pick up the M9. After that, drop down the railing and diffuse the bomb. Finally, pick up the Stun Grenades and leave to the EF Connecting Bridge.
- <html><span style=“color:Aquamarine”>Sons of Liberty / Substance</span> You can shoot the guard first with the Socom and then throw the Chaff Grenade to avoid recieving damage. <br></html>
- <html><span style=“color:Aquamarine”>HD Edition</span> Since Chaff Grenades take more time to blow up, you MUST throw it as soon as you gain control of Raiden otherwise you'll take an Alert. <br></html>
Note: After tossing the Chaff Grenade, you might have enough time to equip the box as the guard shoots Raiden to keep your momentum. This is based on RNG though.
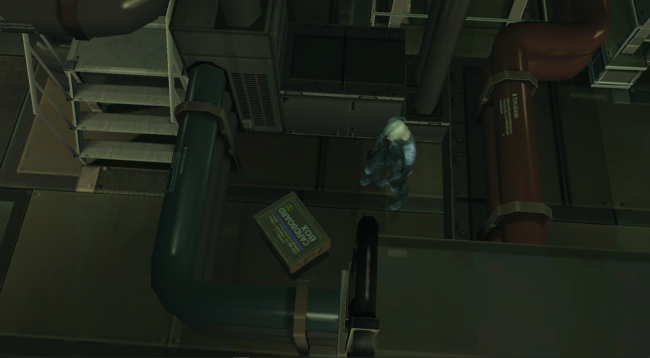
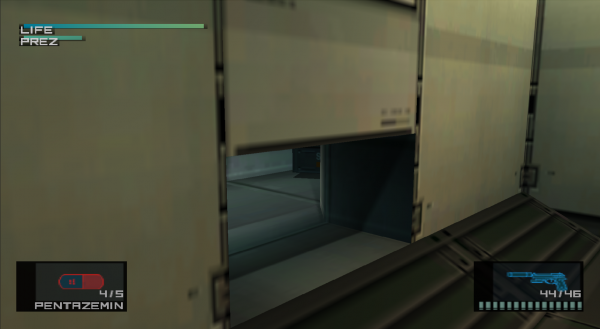
Note: Its possible to diffuse the bomb through a gap in between the boxes. See image below:

EF Connecting Bridge
Optimally, you want to get a caution here before entering the room to skip a mini-cutscene. The Chaff Grenade strategies from Strut F should handle this.
Optional: Throw a Chaff Grenade here to make the timing easier.
Run forward until you reach the first spot where the codec call with Deepthroat will appear, answer it while running.
Move a bit forward until the third line on the floor then cartwheel into prone to pick up the claymore.
Coolant-rise afterwards and meet the northern cypher.
Note: If you used a Chaff Grenade, continue on to Strut E. If you didn't use a Chaff Grenade, either shoot out the northern cypher (risky!) or hide in the box until the path is clear (safe). Continue on to Strut E.
- <html><span style=“color:Aquamarine”>PAL50:</span> Cyphers turn around significantly slower, making buffering or shooting out the northern cypher unnecessary. <br></html>
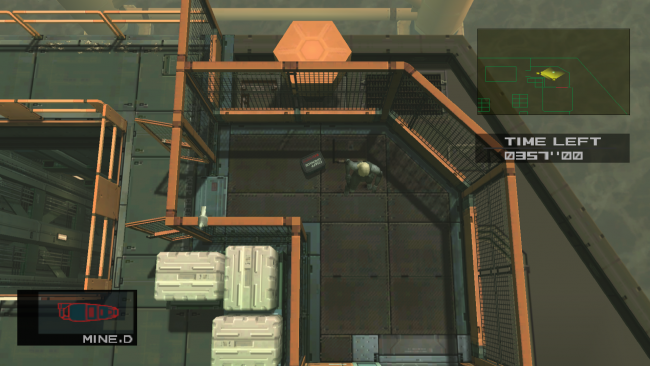
Strut E Parcel Room
The most common strategy in this room is diffuse the bomb first, then head to the the heliport.
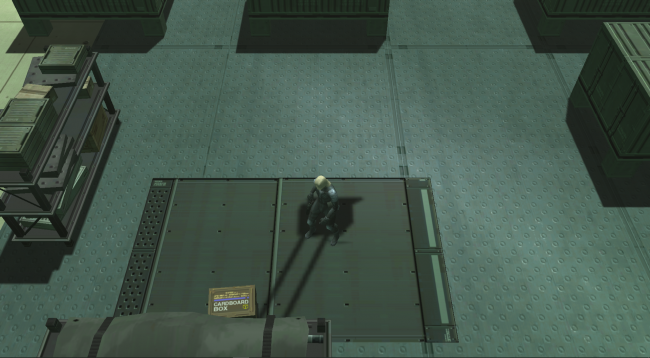
Note: The bomb is placed on one of the boxes that loops around the conveyor belt. It will appear to the player after about ~40 seconds near to where the Box 5 item is located. See image below:

Strut E heliport
Note: You MUST pick up the box here if you plan on doing Conveyor Belt Route.
Strut E Parcel Room
Strut C Dining Hall
Unequip the box and exit the door on the left.
Pickup Sensor B then leave the CD Connecting Bridge.
CD Connecting Bridge
The guard here has weaker vision for whatever reason.
Cartwheel three times until you approach him.
When he spots you, equip and unequip the box to avoid him shooting you and then make your way to Strut D.
- <html><span style=“color:Red”>Any Rank:</span> Run underneath the camera, you will get a transition alert, but it will not carry over to the next room if you're quick enough.<br></html>
- <html><span style=“color:Cyan”>Rank 1:</span> Run around the camera to avoid a transition alert.<br></html>
Strut D Sediment Pool
This is one of the more trickier rooms in the game and will require some practice.
- <html><span style=“color:SandyBrown”>NG and NG++:</span> The three bombs in this room are all placed apart from each other and can be diffused from the bottom floor. The first is in the bottom left hatch, then in the hatch in the middle, and finally near the exit in the bottom right. <br></html>
- <html><span style=“color:SandyBrown”>NG+:</span> The bomb that was near the bottom right exit has been moved closer to the middle bomb. <br></html>
- <html><span style=“color:Cyan”>Rank 1 (Risky):</span> In third person using the auto-aim mechanic, fire one M9 round into the closest guard. Head to the stairs and fire 2 M9 rounds into the other guard (tactical reload using the box). When the two guards spot you, equip the box to avoid being shot. Do a quick shot to the guard on the bottom floor. As long as you hit the bottom guard once, it doesnt matter if he gets instantly knocked out. Diffuse the bombs and leave from the right door on the bottom floor. <br></html>
DE Connecting Bridge
You now have 200 seconds to diffuse the bomb in Strut A Deep Sea Dock. This is more than enough time if you already know the path.
If you opted out of using the Chaff Grenade in Strut D and do not currently have a caution on, use the following strategy:
- Head through the bridge, but stay at the bottom floor.
- Distract the guard by walking on the noisy floor.
- Meet the guard halfway through the stairs and hold him up.
- Head towards the Strut E Parcel Room entrance.
Strut E Parcel Room
Strut A Pump Room
Strut A Roof
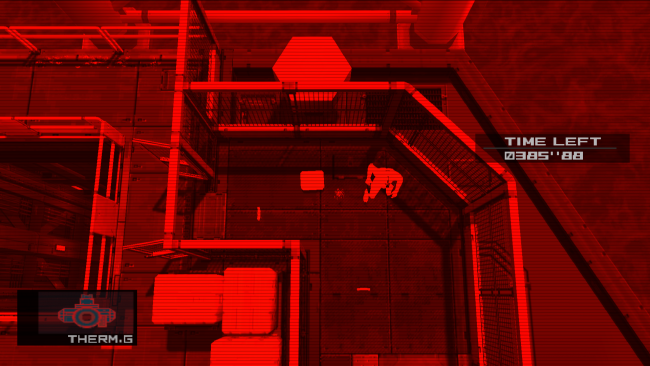
Strut A Deep Sea Dock
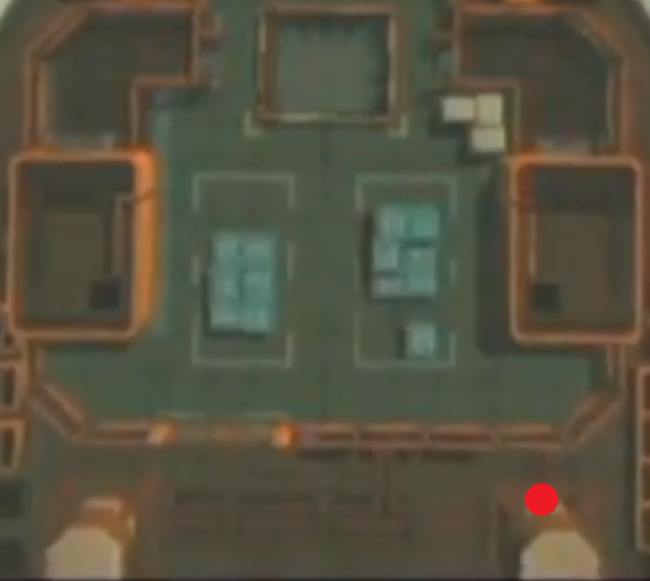
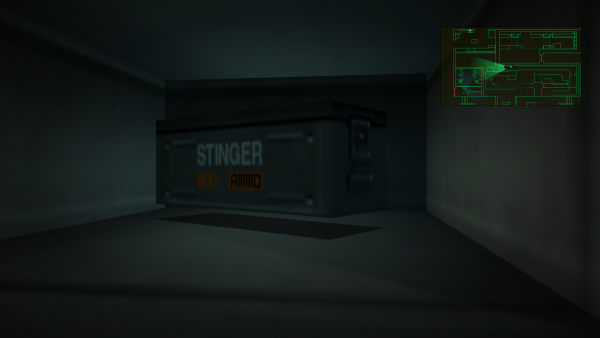
Note: The bomb on (European) Extreme can be found to the wall on the left of where Raiden spawned initially at the start of the Plant chapter. See image below:

Boss Fight: Fortune
This guide will only focus on the standard strategy for Fortune. Please refer to the MGS2 Boss Fight: Fortune page for more advanced strategies and information on the fight.
- <html><span style=“color:Aquamarine”>PlayStation 2:</span> To reduce timeloss due to lag, use the pop-out strategy.<br></html>
For other platforms, the box strategy is just as viable.
There is a safety strategy by going into first person view while proned facing either left or right. For whatever reason, Fortune cannot hit Raiden. Using the Coolant Spray is an easy way to do it.
Big Shell: Bomb Disposal Segment (Part 2)
Now that we're done with the main segment of bomb disposal, we need to diffuse the bomb he's placed on the top of the Strut E heliport. You now have 200 seconds to diffuse the bomb in Strut E heliport. This is more than enough time if you already know the path.
Strut A Roof
Tap R2 to bring out the M9 and avoid the claymores here. Using the box to avoid the claymores can be useful.
If you didn't pick up the Chaff Grenades earlier, pick them up now.
Strut A Pump Room
Cartwheel twice down the stairs
When the guard spots you equip the box.
If done correctly, the guard will open the door for you.
Head towards the FA Connecting Bridge.
FA Connecting Bridge
One of the eastiest rooms in the game. Ignore the guard and just move on towards Strut F from the top floor.
Strut F Warehouse
As you turn the corner, M9 the guard once then immediately equip the box to prevent him from shooting Raiden. After that, fire another round into the guard and then head right. Hold up the guard looking in the opposite direction and leave to the EF Connecting Bridge.
Note: If a guard spots you as you leave, equip and unequip the box to prevent Raiden from being shot.
EF Connecting Bridge
- <html><span style=“color:Aquamarine”>PAL50:</span> Cyphers turn around significantly slower, making buffering or shooting out the northern cypher unnecessary. <br></html>
Strut E Parcel Room
Equip the box as soon as you enter the room and head towards the stairs. Unequip the box and then re-equip when the guard spots you to avoid being shot.
Fire an M9 round into him then cartwheel into him. This should keep the guard tranq-ed when the player returns later in the run.
Strut E heliport
Head upstairs and diffuse the bomb. There are two ways to get a fast bomb diffuse here:
- Method 1: Crouch near the bomb (not too close) to its bottom-right side.
- Method 2: (insert PGSD setup)
Boss Fight: Fatman
This guide will only focus on the standard strategy for Fatman. Please refer to the MGS2 Boss Fight: Fatman page for more advanced strategies and information on the fight.
If you picked up the claymore from the EF Connecting Bridge earlier, it's useful to use it here around the earlier parts of the fight.
- <html><span style=“color:Red”>Any Rank:</span> Killing Fatman is faster than using the M9, as the chip damage done by the Socom when knocking him down reduces the total cycle count.<br></html>
- <html><span style=“color:Aquamarine”>PAL50:</span> There is a loop on Fatman that ONLY works at this framerate, see below: <br></html>
Big Shell: Heading to Ames
Now we need to head to Ames, who is located in the Shell 1 Core, to find out the location of the President. But first, we need to pick up the AK-74u.
Strut E heliport
Do a cartwheel and tap L2 to bring the Box. Before the cartwheel ends, menu one up from the Box to the B.D.U. Keep these menus until around the Harrier segment.
Menu one up to the M9 and then one right to the Socom.
Strut E Parcel Room
If you tranqulizied the guard on the stairs earlier, he should still be knocked out. Otherwise, tranqulize and head downstairs.
Equip the box to avoid being spotted by the guards and head to the EF Connecting Bridge.
EF Connecting Bridge
Wait for the cypher to move then take a down-left direction to the towards the south cypher.
Take out the cypher in first-person view and then head towards to Strut F.
There is a very risky strategy involving a silent shot. Fire at the cypher then pause the game as soon as possible to prevent the guard from hearing the sound of the socom being fired.
Strut F Warehouse
As soon as you gain control of Raiden, do a full punch-punch-kick as a buffer. Cartwheel downstairs once and then head to the first door on the left.
Shoot the wall in front of the guard and then pick up the AK-74u. If the guard spots you, equip the box to prevent being shot and then fire at his radio to prevent an Alert.
Head back to the EF Connecting Bridge.
- <html><span style=“color:Cyan”>Rank 1</span><span style=“color:Yellow”> (Hold The Elevator Strategy):</span> This is a setup for a timesave in the Shell 1 Core B2 Computer Room, requires you to hold up the guard before picking up the AK-74u in order to get a caution. You can use this time to also pickup the Stun Grenades now rather than earlier (saves more time). <br></html>
EF Connecting Bridge
Take the most direct route and head east towards the Shell 1 Core. Take out the cypher near the bridge.
Note: The floors on the bridge will eventually fall when touched. Do NOT stand on them for too long. The floors will regenerate after the Ames sequence.
Shell 1 Core, 1F
- <html><span style=“color:Cyan”>Rank 1</span><span style=“color:Yellow”> (Caution Strategy):</span> Getting a caution in this room is slightly faster for the next room. The best way to do this is to hold up the first guard with the AK-74u and then head into the elevator. <br></html>
- <html><span style=“color:Cyan”>Rank 1</span><span style=“color:Yellow”> (Hold The Elevator Strategy):</span> This is the second part of the setup. Walk up a few steps and then cartwheel up (avoid hitting the Assault Team unit). Hold up the guard near you using the AK-74u and then cartwheel into him. Head into the elevator. <br></html>
Shell 1 Core, B2 Computer Room
- <html><span style=“color:Red”>Any Rank:</span> As soon as you gain control of Raiden, fire the AK-74u in the elevator to cause an Alert. Now head left and pick up the Directional Microphone. If you make it back in time, the elevator should still be open. <br></html>
- <html><span style=“color:Cyan”>Rank 1</span><span style=“color:Yellow”> (Hold The Elevator Strategy):</span> This is the final part of the setup. Throw the assault team unit into the elevator and then pick up the Directional Microphone. If you make it back in time, the elevator should still be open. <br></html>
Shell 1 Core, B1
After skipping the cutscene, knock on the wall to the left to attract the guard. He will then come running to investigate. Do NOT knock many times as this causes him to walk instead of run. Unequip the AK-74u and choke the guard to use him at the retinal scanner.
Note: If you feel you are low on Stun Grenades, there are backup ones in the lockers to the left of this room.
Shell 1 Core, B1 Hall
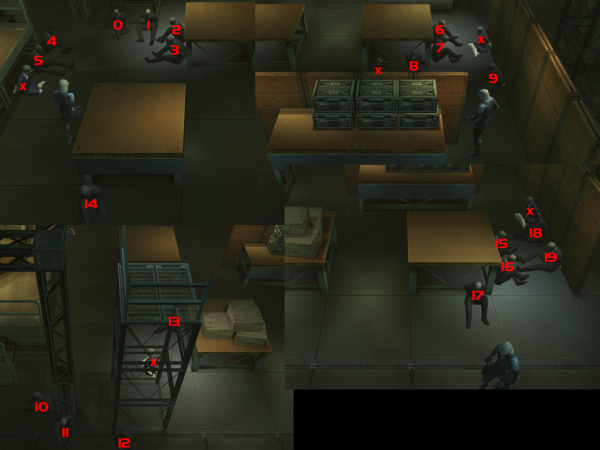
- <html><span style=“color:SandyBrown”>NG:</span> Ames will always spawn in the same position, which is spot #14 on the photo below. <br></html>
- <html><span style=“color:SandyBrown”>NG+ and NG++:</span> Ames can spawn in 20 random positions and the game determines this the moment the player enters the Shell 1 Core, B1 Hall for the first time. <br></html>
If Ames is in an unfavorable position, use the following glitch to equip the D-Mic while the guards still think Raiden has the AK-74u equipped:
- Do a PPK combo with the AK-74u equipped.
- As Raiden is kicking, switch to the D-Mic and hold the FPV button.
- While holding the FPV button, call out to Ames.
Big Shell: Heading to the President
Now we know that the President is in the Shell 2 Core, we need to head there. But first we need to pick up the PSG1.
Shell 1 Core, B1
As soon as the guard spots Raiden, equip the box then hit the elevator button twice.
Turn around and tranquilize the guard with the M9 and then switch to the Chaff Grenade.
Make sure you still have the BDU and Box equipped during this section.
Shell 1 Core, 1F
As soon as you gain control of Raiden, throw a Chaff Grenade and head right. When out of view from the assault team unit near the elevator, tranqulize the three guards blocking the exit. Leave the Shell 1 Core.
Note: There's additional Socom and M9 ammo near the exit if needed.
- <html><span style=“color:Aquamarine”>Sons of Liberty and Substance (Risky):</span> As soon as you gain control of Raiden, throw the Chaff Grenade and head right. Move under the camera and then head towards the guard's left side (near the wall). Hold him up, then cartwheel into the assault team unit and leave the Shell 1 Core.<br></html>
- <html><span style=“color:Aquamarine”>HD Edition(Risky):</span> As soon as you gain control of Raiden, throw the Chaff Grenade and head right. Move under the camera and shoot the wall to the left of the assault team unit. Sneak behind the assault team unit and leave the Shell 1 Core.<br></html>
EF Connecting Bridge
Before you turn around the corner, shoot the closest cypher.
Go into FPV and shoot out the other two cyphers. Head towards Strut F Warehouse.
- <html><span style=“color:Cyan”>Risky:</span> This is a similar strategy, but will only use 3rd-Person aiming and will NOT take out the farthest cypher. Since not all cyphers were taken out, they destroyed ones will respawn on your visit here. <br></html>
Note: The floors on the bridge will eventually fall when touched. Do NOT stand on them for too long. The floors will NOT regenerate when you return to this section later in the run. Make sure no gap is too big to cartwheel over.
Strut F Warehouse
Head left and when the guard spots you, equip and unequip the box then tranqulize him.
Note: Keep a look out on the bottom floor to see if any guards are running upstairs.
Head to the room with the PSG1 and pick it up, then leave back towards the EF Connecting Bridge.
Note: If one guard was approaching, equip and unequip the box when leaving. If an additional assault team unit was approaching, use the railing to the right when leaving.
EF Connecting Bridge
- <html><span style=“color:Aquamarine”>PAL50:</span> Cyphers turn around significantly slower, making buffering or shooting out the northern cypher unnecessary. <br></html>
Strut E Parcel Room
Head left and equip the box, hug the conveyor belt and only continue moving after the assault team unit has turned around.
Keep heading left then north to exit to the DE Connecting Bridge.
If you take a specific line, it is possible to avoid getting spotted by the guard or assault team unit without having to equip the box. If you do this, it is recommend that you shot the south camera while doing the Bomb Disposal Segment.
DE Connecting Bridge
One of the easiest rooms in the game, just head towards Strut D Sediment Pool.
Note: If the Caution bar is close to depleting, wait near the entrance to Strut D Sediment Pool until it completly goes away. This will prevent an assault team unit approaching Raiden in the next room.
Strut D Sediment Pool
Head towards the northern door.
When the guards spot you, equip and unequip the box.
Doing an aerial over the stairs is a little bit faster but there is a good chance the assault team unit will spot Raiden and cause an Alert.
Shell 1-2 connecting bridge
Boss Fight: Harrier
This guide will only focus on the standard strategy for Harrier. Please refer to the MGS2 Boss Fight: Harrier page for more advanced strategies and information on the fight.
Shell 1-2 connecting bridge
Strut L Perimeter / KL Connecting Bridge
- <html><span style=“color:Aquamarine”>PAL50:</span> Cyphers turn around significantly slower, making using a chaff or shooting the cyphers on the KL Connecting Bridge unnecessary. <br></html>
Shell 2 Core, 1F Air Purfication Room
Shell 2 Core, B1 Filtration Chamber No.1
- <html><span style=“color:Aquamarine”>Sons Of Liberty:</span> Swim Skip is possible in this version. <br></html>
Shell 2 Core, 1F Air Purfication Room
If you have 7+ Stinger rounds and plan to do non-lethal Vamp 1, fire the Nikita from the small room in the south-west. Destroy the camera to the left then fire 6 Stinger rounds at the vent before using the Nikita.
If you have less than this, fire the Nikita missile through the main vent.
After meeting the President, cartwheel south into the door.
- <html><span style=“color:Red”>Any Rank:</span> If you plan to do lethal Vamp 1 and Swim Glitch, pickup the Stinger ammo from the vent to the south.<br></html>
When you're done with all the cutscenes and codecs, head towards the elevator. Your menus will be based on whether you choose to do lethal or non-lethal Vamp 1.
- <html><span style=“color:Cyan”>Rank 1:</span> You must do non-lethal Vamp 1. From the Socom, menu once to the M9.<br></html>
- <html><span style=“color:Red”>Any Rank:</span> You can do either Vamp 1 strategies. If you plan to do non-lethal, follow the Rank 1 menus. Otherwise, tap R2 to go Nikita and equip the Stinger. Keep the Stinger on your previous. <br></html>
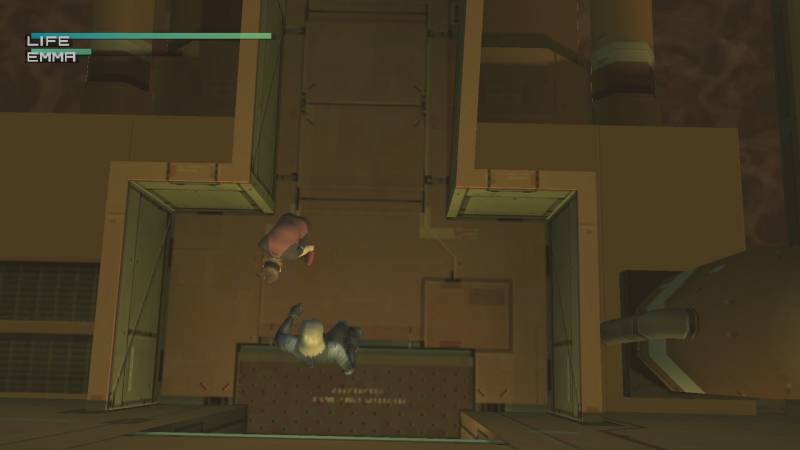
Big Shell: Emma Escort
And thus begins the final and most tedious part of the Big Shell sequence, the Emma Escort. First we need to find her and then escort her all the way back to Shell 1.
Shell 2 Core, B1 Filtration Chamber No.1
The main strategy is to use swim glitch here, as it saves time over swimming normally. This can be tricky and unless you're doing it in 3 or less cycles, you are most likely losing time. For more information, visit the MGS2 Swim Glitch page.
- <html><span style=“color:Aquamarine”>Sons Of Liberty:</span> Swim Skip is possible in this version. <br></html>
- <html><span style=“color:Red”>Any Rank:</span> If you plan to do lethal Vamp 1, this is your last opprutunity to pick up additional Stinger ammo if you have less than 16. Picking this pack up over here is slower as you have to opt-out of Swim Glitch or Swim Skip. <br></html>
Boss Fight: Vamp 1
This guide will only focus on the standard strategy for Vamp 1. Please refer to the MGS2 Boss Fight: Vamp 1 page for more advanced strategies and information on the fight.
- <html><span style=“color:Red”>Any Rank:</span> Using the lethal stinger strategy for this fight is the fastest way to do this. This will count as a kill.<br></html>
- <html><span style=“color:Cyan”>Rank 1:</span> Using the non-lethal punch strategy for this is the fastest way to do it without getting a kill.<br></html>
Lethal Vamp 1:
- Equip the Stinger and fire at the water next to Vamp's leg.
- Wait a brief moment then fire again.
- Repeat until the fight is over.
Note: At least 16 Stinger rounds are required.
Note: On platforms without lag, this will have to be done in quick succession. On platforms with lag, the timing between shots is larger.
Non-Lethal Vamp 1:
- Shoot Vamp once with the M9 to make him dive in the water.
- Hang of the edge and wait for him to approach Raiden.
- Once Vamp is about to swing at Raiden, go up to get invincibility frames while Vamp is swinging his knife.
- Punch Vamp as many times as you can (don't kick!).
- When Vamp is about to swing again, move away to dodge his attack then come close to him again to start punching.
- Repeat the previous two steps until the end of the fight.
Note: Instead of hanging off the ledge, its slightly quicker to crawl on the floor and coolant rise when Vamp approaches Raiden. Using the Socom to shoot at him while he walks towards you will make him move faster.
Note: Kicking Vamp accidentally during this method will mean you'll have to reset the loop by going to hanging mode again or crawling on the floor.
Note: Having the final hit of the fight be a kick is slightly faster as the game transitions to the next cutscene quicker.
Shell 2 Core, B1 Filtration Chamber No.2
Swim your way to Emma, but pickup the Body Armor before hand.
Picking up the Body Armor loses about 7 seconds, however it makes surviving Tengu 1 significantly easier. It is highly recommended to pick it up.
Shell 2 Core, B1 Filtration Chamber No.2 (swim with Emma)
Swim back to Vamp's room with Emma.
When you surface with Emma, leave her and go into the room yourself. The game will play the next cutscene regardless.
Shell 2 Core, B1 Filtration Chamber No.2
Standard Method:
- Drag Emma to the southern door. Go through the right path as the left path is filled with claymores.
Emma Zip:
- Bump Emma into the wall to have her disappear. You can still trigger the next cutscene to the south.
Shell 2 Core, B1 Filtration Chamber No.1
Swim back all the way to the Elevator, be wary of mines along the way.
Note: If you did Swim Glitch / Swim Skip, you will have to open one of the hatches along the way. This will lose about ~7 seconds, but depending on how well Swim Glitch / Swim Skip was executed, it would be a net timesave overall.
- <html><span style=“color:Cyan”>Rank 1:</span> Pick up the PSG1-T along the way, this will be needed later on in the run. It can be found in the room with the broken platforms. <br></html>
When you finally surface, drag Emma close to the sealices.
Let her go aand hit the elevator button twice then go back and choke Emma into the elevator.
Shell 2 Core, 1F Air Purfication Room
There are three different ways to do this room, they will be arranged from slowest to fastest:
- <html><span style=“color:Aquamarine”>HD Edition/MC version:</span> Doing the Emma Bump on this version is incredibly risky as Emma can fall through the map. This causes a softlock and the run is over at this point. It is highly recommended to NOT bump Emma through the Shell 2 Core loadzone on this version.<br></html>
Standard Method:
- Drag Emma directly south until Raiden hits the wall
- Turn left and when you approach the small room, make a sharp right.
- Keep hugging the right and bottom walls in the small room.
- As you go down the stairs and approach the two guards, let go of Emma and tranqulize both of them.
- Drag Emma to the end of the map and tranqulize the final guard who spawns in.
- Drag Emma into the next loadzone or bump her into it.
Tylerportation:
- Info needed.
Emma Zip:
- Info needed.
Various Strategies side by side based on the Master Collection version on PC (untested for other platforms/versions)
KL Connecting Bridge
There are two different ways to do this room, they will be arranged from slowest to fastest:
Standard Method:
- Info needed.
Emma Zip:
- Info needed.
- The best position to stand when spraying is the black line to the top of the fire. A good audio cue is when the phone begins to ring.
- The visual cue to stop spraying at the fire is when the black smoke appears.
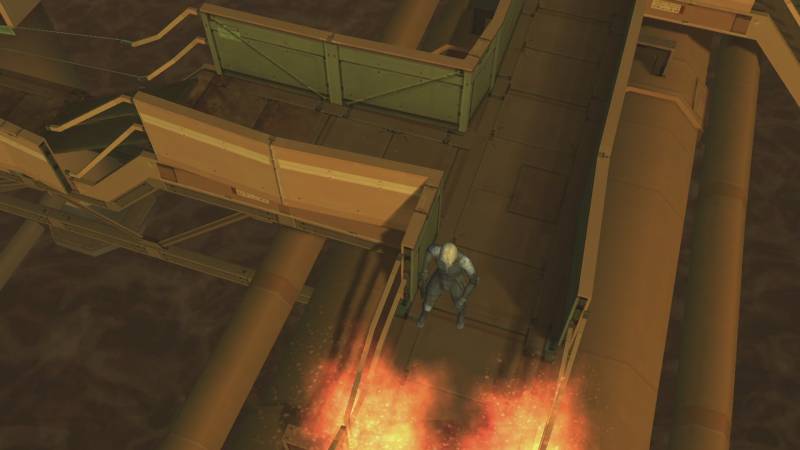
- When Emma gets past the thin part of the bridge, let go of her and head to the southern door.
Strut L Sewege Treatment Facility
Drag Emma forward until both guards are in sight and before the closer guard moves away.
Take out the M9 and tranqulize both of them.
Head towards the Oil Fence past the hatch.
Strut L Oil Fence
Hidden Claymore Setup:
- Stick to the right-most side of the railing.
- Let go and punch 4 times.
- Turn left and punch 2 times.
- Equip the PSG1 / PSG1-T and fire at the claymore.
Recommended to do this as after Emma is moving / moved around the first pillar.
Boss Fight: Vamp 2
This guide will only focus on the standard strategy for Vamp 2. Please refer to the MGS2 Boss Fight: Vamp 2 page for more advanced strategies and information on the fight.
- <html><span style=“color:Red”>Any Rank:</span> Using the lethal PSG1 is the fastest way to do this fight as you don't have to pause between every 5 shots. <br></html>
- <html><span style=“color:Cyan”>Rank 1:</span> Using the non-lethal PSG1-T is required to not get a kill here. <br></html>
Lethal Vamp 2:
- Use a Pentazemin.
- Aim the PSG1 at Vamp's leg then spam until the end of the fight.
Non-Lethal Vamp 2:
- Make sure your PSG1-T has no ammo in it before the fight starts.
- As soon as it start, unequip and crouch on top of the the PSG1-T ammo that spawns.
- Use a Pentazemin.
- Aim the PSG1 at Vamp's leg then spam until the end of the fight.
Note: You can use a Pentazemin prior to the fight and the effect will carry over.
Strut E Parcel Room, B1
When the guard spots you, equip the box to dodge his attack or just cartwheel into his shot.
Finally, bump into him before leaving to prevent him from calling in an Alert.
Note: Tap R2 to equip either the PSG1 or PSG1-T then one menu one up to the Chaff Grenades if you have any.
EF Connecting Bridge
Throw a Chaff Grenade as soon as you gain control of Raiden. Wait a brief moment to prevent the cypher from spotting you.
Make your way to the Shell 1 Core and be mindful of the gaps on the bridge.
Shell 1 Core, 1F
Head towards the elevator.
There are no guards or cameras in this room.
The elevator door is already opened, cartwheel into it to trigger the next cutscene faster.
Arsenal Gear
The final part of the run. Only one stealth-related section followed by a barrage of guard rushes and boss fights. Good luck!
Arsenal Gear: Stomach
Skip the cutscenes until the torture sequence begins. You do NOT have to mash for this. Even if Raiden's 02 completly drops, you will not lose any health.
After Olga punches Raiden (you lose ~33% of your health), call Rose yourself on the codec rather than waiting for her to call.
Head to the exit on the right.
Arsenal Gear: Jejunum
The most important part here is to avoid getting shot, as health will be important for the first Tengu battle and Raiden will not get a health refill until AFTER the MG-Rays fight.
- <html><span style=“color:Cyan”>Rank 1 (Safe):</span> When you get to the top floor, head left. Go underneath the camera then head right again. After that, take the most direct route towards the Ascending Colon.<br></html>
- <html><span style=“color:Red”>Any Rank (Risky):</span> Even though getting an Alert is riskier, it is possible to do that and also avoid getting shot. Take the right most route on the top floor and avoid getting spotted by the first guard. Make the gap then head to the north-east guard. After he spots you and causes the alert, cartwheel into him. Cartwheeling later is better than being too early, to avoid being kicked.<br></html>
- <html><span style=“color:Cyan”>Rank 1 (Risky):</span> Take the right most route on the top floor and avoid getting spotted by the first guard. Make the gap then head to the north-east guard. Wait for the camera to turn then head to the door to the Ascending Colon. <br></html>
Arsenal Gear: Ascending Colon
You need to answer 5 codec calls here before the mandatory Rose call comes in. As soon as you enter the room, hold select to answer Codec #1 on the first frame. As you head north, answer codec calls. After Codec #5, hold select to answer the Rose call on the first frame.
In the second part of this room, a 45 second timer will begin AFTER the player swipes the H.F blade for the first time. So as soon you gain control of Raiden, hold the right analog stick in any direction to swipe the blade in any direction.
Note: Equip the Body Armor (and Box on your previous) AFTER swiping the blade to avoid any timeloss.
- <html><span style=“color:Aquamarine”>Sons Of Liberty (JPN and KOR):</span> The HF Blade practicing sequence lasts 30 seconds after the first swipe of the blade. <br></html>
Tengu 1
This guide will only focus on the standard strategy for Tengu 1. Please refer to the MGS2 Boss Fight: Tengu 1 page for more advanced strategies and information on the fight.
Tengu 2
This guide will only focus on the standard strategy for Tengu 2. Please refer to the MGS2 Boss Fight: Tengu 2 page for more advanced strategies and information on the fight.
- <html><span style=“color:Aquamarine”>Sons Of Liberty:</span> Coolant Skip is consistent. This is a safer version of the skip as Snake will not die. <br></html>
- <html><span style=“color:SandyBrown”>Extreme:</span> During this fight, Snake can throw a ration if Raiden's health is low. If you are playing with <span style=“color:Red”>Any Rank</span> in mind, this is more useful than the Body Armor. <br></html>
MG-Rays
This guide will only focus on the standard strategy for MG-Rays. Please refer to the MGS2 Boss Fight: MG-Rays page for more advanced strategies and information on the fight.
- <html><span style=“color:SandyBrown”>Extreme:</span> During this fight, a ration can spawn in the middle of the map if Raiden's health is low. If you are playing with <span style=“color:Red”>Any Rank</span> in mind, this is more useful than the Body Armor. <br></html>
Before the fight begins, stock up on Stinger ammo. Keep the Socom equipped and the Stinger on your previous.
The fight will be of two phases:
- Setting up the loop
- The loop itself.
Setting up the loop:
- Cartwheel forward and equip the Stinger.
- Fire at the leg of the the middle Ray (A01E), then its open head.
- Fire at the leg of the the right Ray (A02E), then its open head.
- Fire at the leg of the the left Ray (A03E), then its open head.
- Repeat the previous three steps one more time.
- Now fire at the leg of the middle Ray (A01E), then its open head. Followed immediately by firing at the closed-head of the right Ray (A02E).
- Unequip the Stinger and run south. Once the middle Ray (A01E) jumps in, cartwheel.
- As A01E tries to use its water cannon attack, move right. Fire at its leg then open-head to finish it off.
- Look right and fire at the leg of A02E then its open-head to finish it off.
- Collect additional Stinger ammo as you wait for the left Ray (A03E) to jump in.
- Fire at the leg of A03E followed by a delayed open-head shot.
- Do the previous step one more time, and if you delayed enough last time, you won't have to delay now.
- Stand on the Stinger ammo in the top right corner of the map. This is where the Rays will be coming from during the loop and the remainder of the fight will take place around here.
That's it! You're prepared for the loop. However, if you didn't delay enough with the shots at A03E towards the end, then the loop will most likely break at the next Ray.
The Loop:
- explain pls.
Torture Sequence
During this torture sequence, the player is required to mash the action. The duration for how long will depend on version and platform.
Note: Using turbo will make this easier for players who do not enjoy mashing or have trouble mashing for long sequences.
Note: Looking at Snake or the MG-Ray makes the torture sequence last longer on consoles with a lot of lag.
- <html><span style=“color:Aquamarine”>Sons of Liberty and Substance</span><span style=“color:SandyBrown”> (Extreme):</span> The torture sequence lasts for ~25 seconds.<br></html>
- <html><span style=“color:Aquamarine”>Sons of Liberty and Substance</span><span style=“color:SandyBrown”> (European Extreme):</span> The torture sequence lasts for ~55 seconds.<br></html>
- <html><span style=“color:Aquamarine”>PAL50:</span> The torture sequence lasts longer.<br></html>
- <html><span style=“color:Aquamarine”>HD Edition (PlayStation 3):</span> The torture sequence lasts for ~15 seconds and the game gives Raiden an Easy healthbar. <br></html>
Solidus
This guide will only focus on the standard strategy for Solidus. Please refer to the MGS2 Boss Fight: Solidus page for more advanced strategies and information on the fight.
- <html><span style=“color:SandyBrown”>Extreme:</span> During this fight, a ration can spawn near the north-west side of the map (from initial camera angle) if Raiden's health is low. If you are playing with <span style=“color:Red”>Any Rank</span> in mind, this is more useful than the Body Armor. <br></html>
For the whole fight, we'll be doing a loop at Solidus that looks like this:
- Hit Solidus twice with the H.F Blade on his good eye. He will block this.
- Before Solidus counters with a kick, hit Solidus with three punches on his bad eye.
- Repeat until the end of every phase.
Some notes:
- Three punches means DoublePunch x1, SinglePunch x2. It can also be done with SinglePunch x3.
- If you find the loop too fast to keep up with, block Solidus' kick with the H.F Blade (hold L1) then punch him. Then repeat the loop.
- If Solidus blocks your punches, block his incoming kick then try to set up the loop again.
- If you catch on fire by Solidus, equip and unequip the B.D.U to put it out.
- At the start of the second phase, Solidus will attempt to dash at Raiden. This can be blocked with the H.F Blade.
Credits and Score Screen
Skip the cutscenes after finishing off Solidus and the cutscenes after the credits sequence. Time will end at the Score Screen and Rank will be shown after that.
- <html><span style=“color:Aquamarine”>HD Edition (PlayStation 3):</span> On this version and platform, sometimes the credits can lock up (called a 'Credit Freeze'). Unfortunately, this means a run that has this can NOT go on the leaderboards as it has no score screen. <br></html>
- <html><span style=“color:Aquamarine”>Sons Of Liberty:</span> The rank screen will NOT show your final rank. For <span style=“color:Cyan”>Rank 1</span>, a score screen with a time of 3:00:00 or less, 8 or less Saves, 0 Continues, 3 Alerts, 0 Kills, and 0 Rations, and no special items used is enough for the leaderboards to consider it a Big Boss Rank.<br></html>