Table of Contents
Big Shell: Pre-Stillman
Strut A Deep Sea Dock
Strut A Roof
Strut A Pump Room
AB Connecting Bridge
Strut B Transformer Room
BC Connecting Bridge
Strut C Dining Hall
Big Shell: Bomb Disposal Segment (Part 1)
Strut C Dining Hall
BC Connecting Bridge
Strut B Transformer Room
AB Connecting Bridge
Strut A Pump Room
Strut A Roof
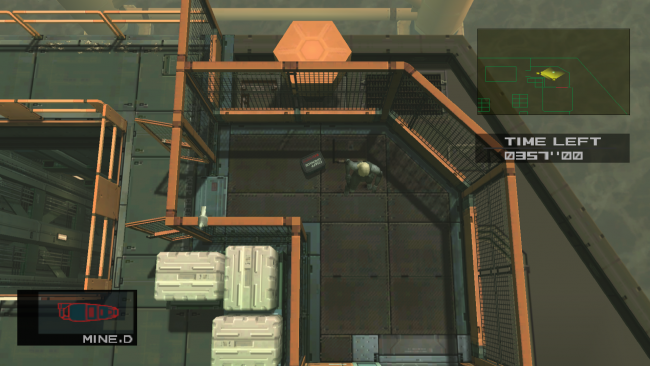
Note: The bomb is placed behind a fence on the south-east section of the room. See image below:
Strut A Pump Room
Note: You MUST pick up the box here if you plan on doing Conveyor Belt Route.
FA Connecting Bridge
Strut F Warehouse
EF Connecting Bridge
- When Raiden reaches the third black line on the floor coming from the south, do an aerial into prone to pickup the claymore. Coolant-rise right after that.
Strut E Parcel Room
Strut E heliport
Note: You MUST pick up the box here if you plan on doing Conveyor Belt Route.
Strut E Parcel Room
Strut C Dining Hall
CD Connecting Bridge
Strut D Sediment Pool
DE Connecting Bridge
Strut E Parcel Room
Strut A Pump Room
Strut A Roof
Strut A Deep Sea Dock
Boss Fight: Fortune
This guide will only focus on the standard strategy for Fortune. Please refer to the MGS2 Boss Fight: Fortune page for more advanced strategies and information on the fight.
Big Shell: Bomb Disposal Segment (Part 2)
Strut A Roof
Tap R2 to bring out the M9 and avoid the claymores here. Using the box to avoid the claymores can be useful.
If you didn't pick up the Chaff Grenades earlier, pick them up now.
Strut A Pump Room
FA Connecting Bridge
Strut F Warehouse
EF Connecting Bridge
Strut E Parcel Room
Strut E heliport
Boss Fight: Fatman
This guide will only focus on the standard strategy for Fatman. Please refer to the MGS2 Boss Fight: Fatman page for more advanced strategies and information on the fight.
Big Shell: Heading to Ames
Strut E heliport
Strut E Parcel Room
EF Connecting Bridge
Strut F Warehouse
EF Connecting Bridge
Shell 1 Core, 1F
Shell 1 Core, B2 Computer Room
Shell 1 Core, B1
Shell 1 Core, B1 Hall
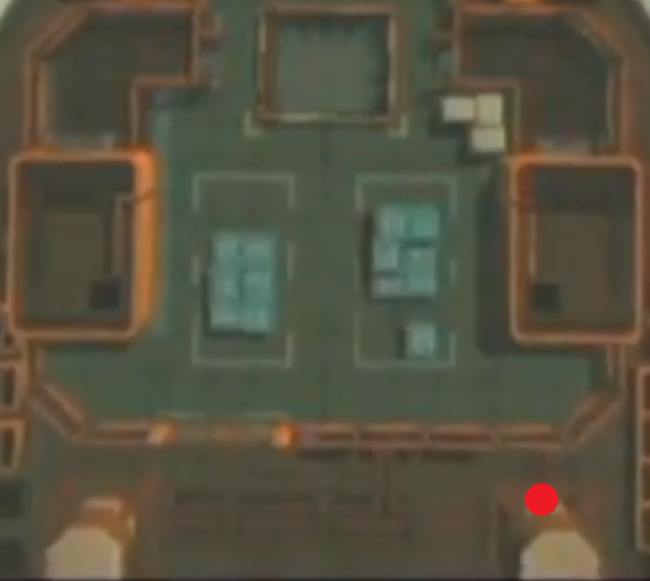
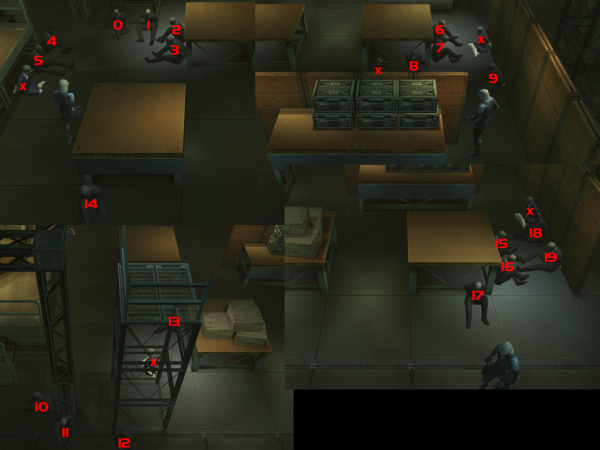
- <html><span style=“color:SandyBrown”>NG:</span> Ames will always spawn in the same position, which is spot #14 on the photo below. <br></html>
- <html><span style=“color:SandyBrown”>NG+ and NG++:</span> Ames can spawn in 20 random positions and the game determines this the moment the player enters the Shell 1 Core, B1 Hall for the first time. <br></html>
Big Shell: Heading to the President
Shell 1 Core, B1
Shell 1 Core, 1F
EF Connecting Bridge
Strut F Warehouse
EF Connecting Bridge
Strut E Parcel Room
DE Connecting Bridge
Strut D Sediment Pool
Shell 1-2 connecting bridge
Boss Fight: Harrier
This guide will only focus on the standard strategy for Harrier. Please refer to the MGS2 Boss Fight: Harrier page for more advanced strategies and information on the fight.
Shell 1-2 connecting bridge
Strut L Perimeter / KL Connecting Bridge
Shell 2 Core, 1F Air Purfication Room
Shell 2 Core, B1 Filtration Chamber No.1
Shell 2 Core, 1F Air Purfication Room
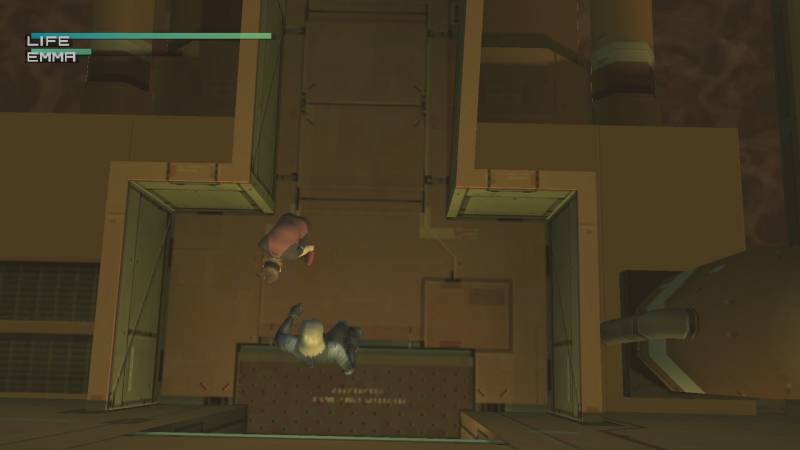
Big Shell: Emma Escort
Shell 2 Core, B1 Filtration Chamber No.1
Boss Fight: Vamp 1
This guide will only focus on the standard strategy for Vamp 1. Please refer to the MGS2 Boss Fight: Vamp 1 page for more advanced strategies and information on the fight.
Shell 2 Core, B1 Filtration Chamber No.2
Shell 2 Core, B1 Filtration Chamber No.2 (swim with Emma)
Shell 2 Core, B1 Filtration Chamber No.2
Shell 2 Core, B1 Filtration Chamber No.1
Shell 2 Core, 1F Air Purfication Room
New method using the M9 twice (optional hold up for box guard)
- Drag Emma bottom left until you're at the corner of the wall
- shoot the M9 twice while going FPV and holding auto-aim.
- then keep dragging Emma until you're at the dark line
- leave Emma there and walk the rest to the end of the level
- optional: if you dragged Emma too far in, you have to hold up the guard at the box
- leave, return
- grab Emma from the Prez room, top left corner
- leave the level with Emma
Alternatives:
https://youtube.com/clip/UgkxPu6t3qLaw615koFrCVp7LNqdYWYyMNfR?si=JT2DWOOS0lHt6p6f
- immediately grab emma and start dragging her down left
- drag emma right on the dark line of the door frame
- then shoot the guard with your M9
- and quickly cartwheel into him
- correct Emma's position if necessary
- run off to the exit of the room towards KL Bridge
- make sure to hold up the upper guard at the box
- leave
- return back to Shell 2 Core 1F
- walk to the Prez room top left corner
- grab Emma and drag her through the door to the KL bridge
For the Master Collection Version specifically the start timing seems to be different (at least on MC PC)
The safer method
- drag Emma straight down first
- until past the dark line, then go down left
- until you're close to the door frame
- OR drag emma right on the dark line of the door frame
- hold up, then shoot the guard with your M9
- quickly cartwheel or PPK him
- correct Emma's position if necessary
- run off to the exit of the room towards KL Bridge
- make sure to hold up the upper guard at the box
- and tranq him for extra safety
- leave
- return back to Shell 2 Core 1F
- walk to the Prez room top left corner
- grab Emma and drag her through the door to the KL bridge
The riskier method
- drag Emma straight down first
- until past the dark line, then go down left
- drag emma right on the dark line of the door frame
- shoot the guard with your M9
- quickly cartwheel or PPK him
- run off to the exit of the room towards KL Bridge
- the extra guard (top of box) should not have spawned if done correctly
- leave
- return back to Shell 2 Core 1F
- walk to the Prez room top left corner
- grab Emma and drag her through the door to the KL bridge
KL Connecting Bridge
- The best position to stand when spraying is the black line to the top of the fire. A good audio cue is when the phone begins to ring.
- The visual cue to stop spraying at the fire is when the black smoke appears.
- When Emma gets past the thin part of the bridge, let go of her and head to the southern door.
Strut L Sewege Treatment Facility
Strut L Oil Fence
Boss Fight: Vamp 2
This guide will only focus on the standard strategy for Vamp 2. Please refer to the MGS2 Boss Fight: Vamp 2 page for more advanced strategies and information on the fight.
Strut E Parcel Room, B1
EF Connecting Bridge
Shell 1 Core, 1F
Arsenal Gear
Arsenal Gear: Stomach
Arsenal Gear: Jejunum
Arsenal Gear: Ascending Colon
Tengu 1
This guide will only focus on the standard strategy for Tengu 1. Please refer to the MGS2 Boss Fight: Tengu 1 page for more advanced strategies and information on the fight.
Tengu 2
This guide will only focus on the standard strategy for Tengu 2. Please refer to the MGS2 Boss Fight: Tengu 2 page for more advanced strategies and information on the fight.
MG-Rays
This guide will only focus on the standard strategy for MG-Rays. Please refer to the MGS2 Boss Fight: MG-Rays page for more advanced strategies and information on the fight.
Torture Sequence
Solidus
This guide will only focus on the standard strategy for Solidus. Please refer to the MGS2 Boss Fight: Solidus page for more advanced strategies and information on the fight.
Credits and Score Screen
Skip the cutscenes after finishing off Solidus and the cutscenes after the credits sequence. Time will end at the Score Screen and Rank will be shown after that.
- <html><span style=“color:Aquamarine”>HD Edition (PlayStation 3):</span> On this version and platform, sometimes the credits can lock up (called a 'Credit Freeze'). Unfortunately, this means a run that has this can NOT go on the leaderboards as it has no score screen. <br></html>
- <html><span style=“color:Aquamarine”>Sons Of Liberty:</span> The rank screen will NOT show your final rank. For <span style=“color:Cyan”>Rank 1</span>, a score screen with a time of 3:00:00 or less, 8 or less Saves, 0 Continues, 3 Alerts, 0 Kills, and 0 Rations, and no special items used is enough for the leaderboards to consider it a Fox Rank.<br></html>