Any% PC Route
Before the Run
Dock
- There are many possible variants to the Docks, but only one thing is required. You must alter right guard's path, or kill him. If you do not, you will not be able to get on the elevator quickly.
- If you alter the left guard's path, you must alter it further or kill him. Unaltered, he leaves the elevator area just before the elevator arrives.
- You can use the credits as visual cues. Head up the left path when CG Artists Takashi Mizutani and Hideki Sasaki appear. The final credit is Assistant Director Yoshikazu Matsuhana.
- You can dive into the water if you are in Alert/Evasion Phase.
Heliport
Tank Hangar
- Once out of the vent, stand up quickly by pressing triangle and X shortly after another. This will skip the stand up animation play out.
- If you do not hold up on the analog for the Miller call, Snake will stop crawling.
- You can also throw the guard approaching the elevator, but it is slower and harder.
Cell
Easier method to Vent Glitch - holding buttons
hold triangle, hold dpad up, let go of triangle, hold X, let go of dpad up and x once standing
Step Count Out of Bounds
- Down 2 Steps
- Left 6 Steps
- Up Left 3 Steps
- Up 7 (edit: 8?) Steps
- Right Into Door
Medical Room
Armory
Canyon
Nuke Building 1F
Nuke Bld. 1F Strat Compilation
examples in the videos are timed as
- 27.2s for stun - it's riskier but faster than above left side chaff
- 29.8s for box trap
Nuke Building B1/Commander's Room
- Skip the Nikita Missile Launcher, you do not need it.
Cave
Step Count Out of Bounds
- Down 1
- Down Right 12
- Down 11
or
- Down 1
- Right 8
- Down 20
Underground Passage
Step Count Out of Bounds
- Down Right 7
- Further routing explanation on dropping down from the roof and going prone to cancel GME in one movement.
Communications Tower A
Boba Skip - 50% successrate on first try
Chaff/Stun damage alignment - click picture for fullscreen
More infos about Boba skip can be found here
Further info on the old glitchless Tower A can be found in Glitchless
Communications Tower B
Crash can occur in front of the exit door. Be careful when doing GME Phase 2 going prone while falling into the door can cause a crash.
Step Count Out of Bounds
- Up 1
- Right 3
- Down 1
Snowfield (Wolf 2)
Before the fight, save 2.5s with the FPV lean trick
faster and easier Wolf2 skip with SWIM
older explanations and tricks that are now slower
Do not use GME or Weapons Glitch prior to being shot by Sniper Wolf this will cause the game to softlock.
Blast Furnace
Step Count Out of Bounds
- Up 1
- Up Left 1
- Up 4
- Up Right 4
- Up 3
Cargo Elevator
The PC speedrun can use the god mode exploit at the start of the fight for an even faster time to finish the cargo elevator fight. In the following the 4 common examples are shown:
- God mode then PPK all guards
- God mode then PPK bottom right guard, fpv, then quick throw the other 2 guards
The PC/Glitched example
the Console/Glitchless example
Bonus grenade + GME example by iLL_Pazzo https://cdn.discordapp.com/attachments/227010328603394049/941334998542327838/2022-02-10_15-08-37.mp4
Warehouse (Raven)
In general this fight is simple enough to do on PC thanks to the usage of GME (god mode exploit).
When starting the fight you can activate GME right away and with the grenades you collected earlier in the run
you can simple walk up to raven with a certain distance to chuck grenades to his feet.
Wait enough time to throw a follow up grenade or else the grenade will explode when Raven's still
in his i-frame state and won't accept new damage. For beginners, you can wait for the explosion to happen first,
then send another grenade in. Ideally you develop a rythmic feeling for how long you have to wait before Raven,
will be out of his i-frames. Here is an example for a more advanced strategy by Setharooni:
In this example, Snake runs up first and holds the weapon and crouch key to immediately skip all cutscenes and start walking.
Then tossing the first pre-cooked grenade at Raven which should quickly explode, followed up by a fresh grenade.
After the first two grenades like that, you can use GME once again for safety and can wait out the i-frames of Raven to continue.
Alternatively you can also always use the glitchless/console strategy with the Nikita weapon around the corner as seen in this guide:
Warehouse North
Underground Base (Rex's Lair)
Underground Base 2
Underground Base 3
Drainage Ditch PAL Key (10+ Alerts)
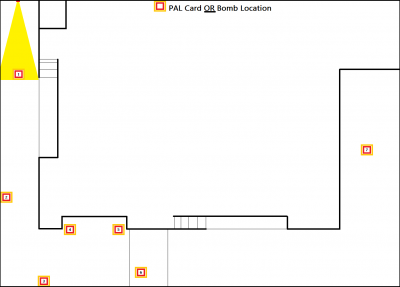
- There are 7 spots the PAL Key (and Bomb) can spawn
- This only happens if you have 10 or more Alerts before entering the room
Rat and Room Temperature (Yellow)
- The rat can hear you shoot regardless of distance, so unequip with R1 to avoid this. For example, the rat is by the turret and you shoot by the stairs.
- Jumping into the ditch will spook the rat, regardless of distance.
Command Room (Computer Room)
Easier than chair trick with SWIM
Computer room for EX to take out camera Unless you have super speedy fingers that is Left+5+Fire+R1+9 Left+5+Fire+9
Low Temperature (Blue)
If you're on Big Boss and want to avoid the alert easily from the guard in the bottom left corner of the Rex Layer 3F room,
try this method developed by Tromboncino:
High Temperature (Red)
See here different versions of grabbing the extra stinger ammo you need for extreme difficulty. On lower difficulty it can save frames not grabbing the warehouse north Stinger ammo, but the BF ammo.
ONLY FOR VERY EASY Save 2 seconds by area reloading After the warm key has been inserted and Liquid called you on the codec. Then call Otacon and wait outside the room. This way the door never closed but the flag for Otacon opening the door for you advances still.
Video example by iLL_Pazzo
MG-REX
Liquid Snake
- If you fall off the edge, you will die on Extreme
- During Phase 2, Liquid will counterattack even if you finish with a kick on Hard and Extreme; on Easy and Normal he will run away
- You can PPK to finish Liquid off at 16 HP on Easy
- You can PPK to finish Liquid off at 12 HP on all difficulties besides Easy
- You cannot throw Liquid to finish the fight if you knock him down with 0 HP on Normal, Hard and Extreme. Instead, PPK
Various 2, 1 and 0 throw setups
another bottom left side no throw setup by Tromboncino
