Stage 04 Hard
- Hard and Very Hard are fairly similar, as guard and camera patterns are the same
- Hard gives more resources than Very Hard, but fewer than Easy or Normal
- Hard and Very Hard both have boss behavior modifiers
- Snake can take more damage than on Very Hard
<html> <b><span style=“color:Red”>LOOK BELOW FOR ROUTE UPDATES</span></b> </html>
BadHumans found an alternative line that saves 4 seconds at the start of the stage.
- Do a small delay at the door in the gas mask room. Example here
- The Casino Bird Line on Any% must be adjusted compared to Easy and Normal. Example here
- There is a way to run on alert and avoid getting damaged in the guard mud room, but it's inconsistent. Example here
- R5 does not spawn by the rock in the bird room.
- Faster approach for final dogs room. “Dogs are harmless when they're on a diagonal line. It's only when they are running on a y & x axis that they're dangerous” - Badhumans
Doors Puzzle
- Make sure to press the button on the edge closest to the next button
- Be careful not to mash while pressing and accidentally press again
- On the 3 shifts, you can press normally on the first then rapidly mash on the second to have the third one occur automatically (refer to the above bullet point)
- You can swap the first and second buttons in any sequence, but the preferred orders are listed below
KEY
| Memory ID | Description |
|---|---|
| 0 | 1,3,5 - adds or removes doors in the first, third, and fifth position |
| 1 | SOLUTION - removes or adds two doors from the fourth and fifth position, the button the guard presses |
| 2 | SHIFT - shifts the doors |
| 3 | RESET - resets the puzzle |
1st Pattern - Guard Presses Button 1
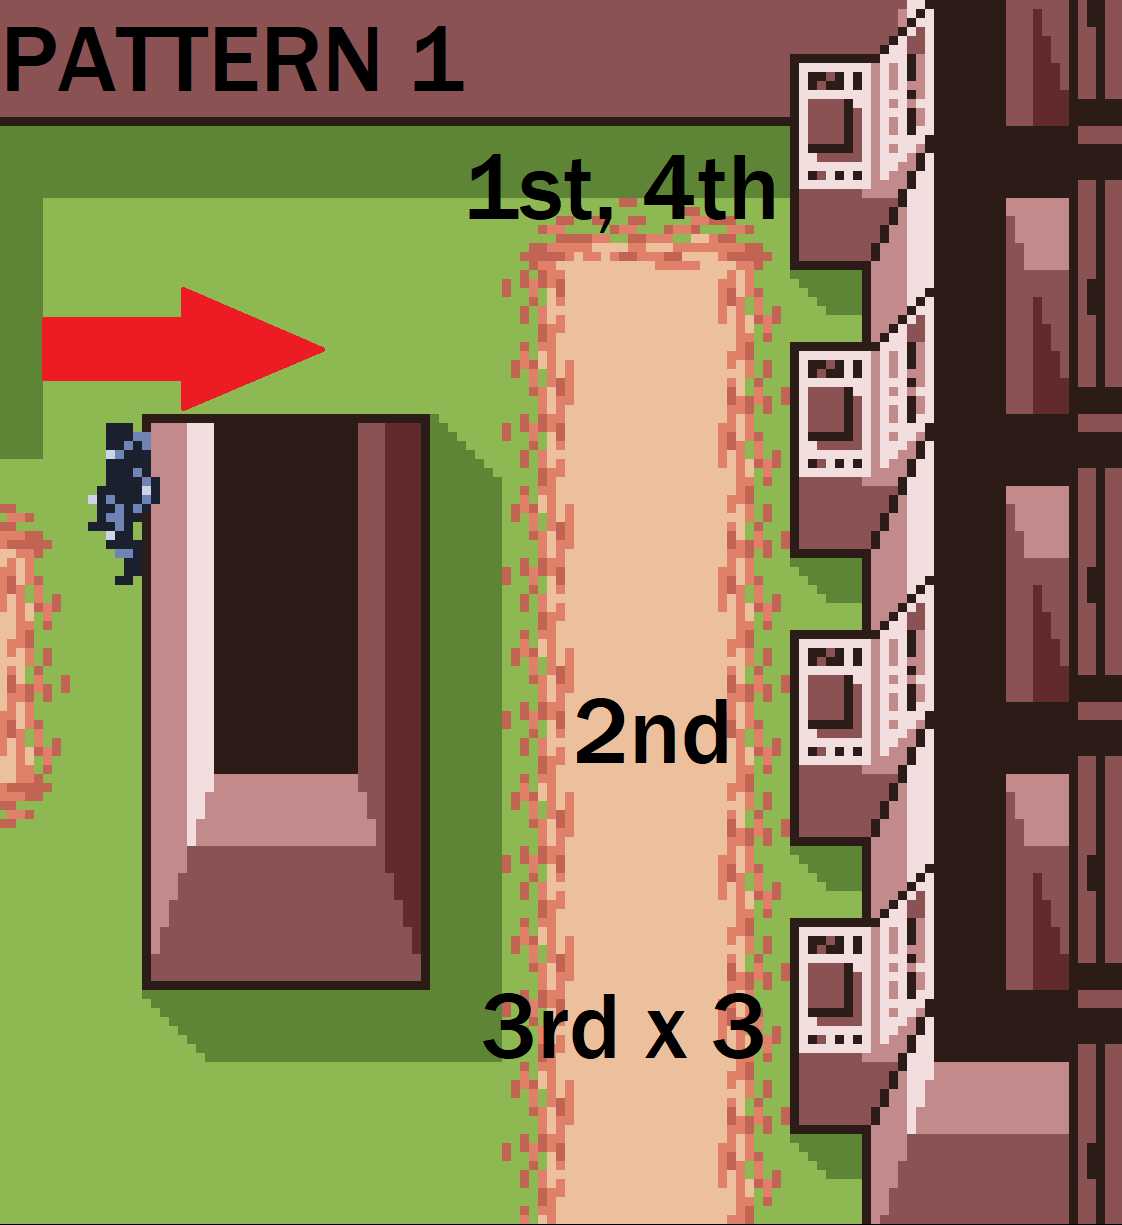
1, 3, 4, 4, 4 and 1 (button order)
Represented in Memory as 1302
| Pattern (Top to Bottom) | Button Order |
|---|---|
| SOLUTION | 1st, 4th |
| RESET | DON'T PRESS |
| 1,3,5 | 2nd |
| SHIFT | 3rd X3 |
(SOLUTION > 1,3,5 > SHIFTx3 > SOLUTION)
2nd Pattern - Guard Presses Button 2
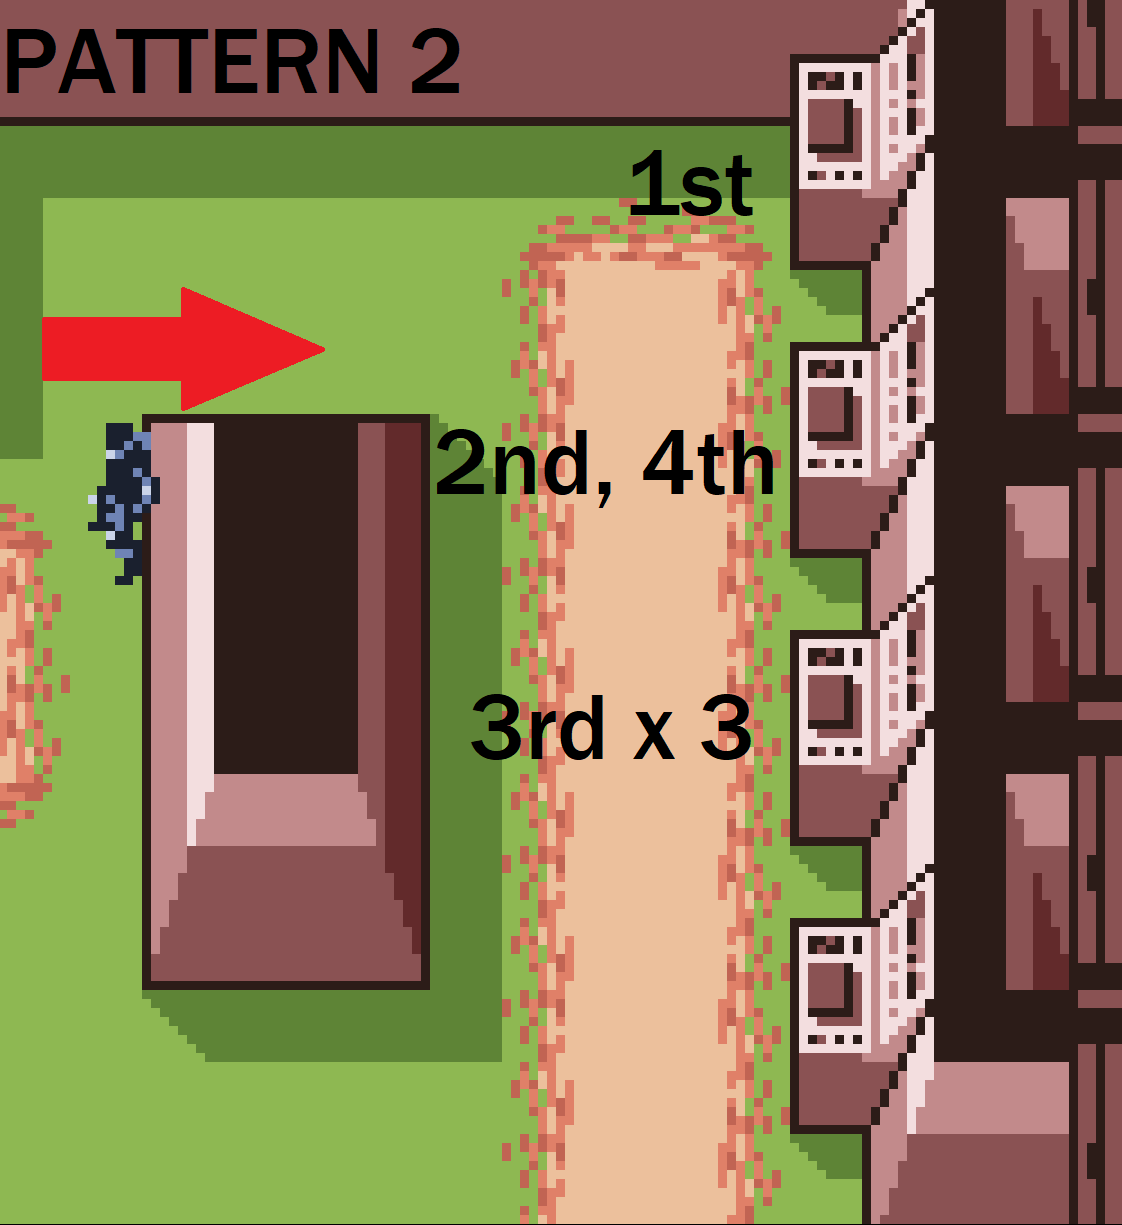
1, 2, 3, 3, 3, and 2 (button order)
Represented in Memory as 0123
| Pattern (Top to Bottom) | Button Order |
|---|---|
| 1,3,5 | 1st |
| SOLUTION | 2nd, 4th |
| SHIFT | 3rd X3 |
| RESET | DON'T PRESS |
(1,3,5 > SOLUTION > SHIFTx3 > SOLUTION)
3rd Pattern - Guard Presses Button 3 3210
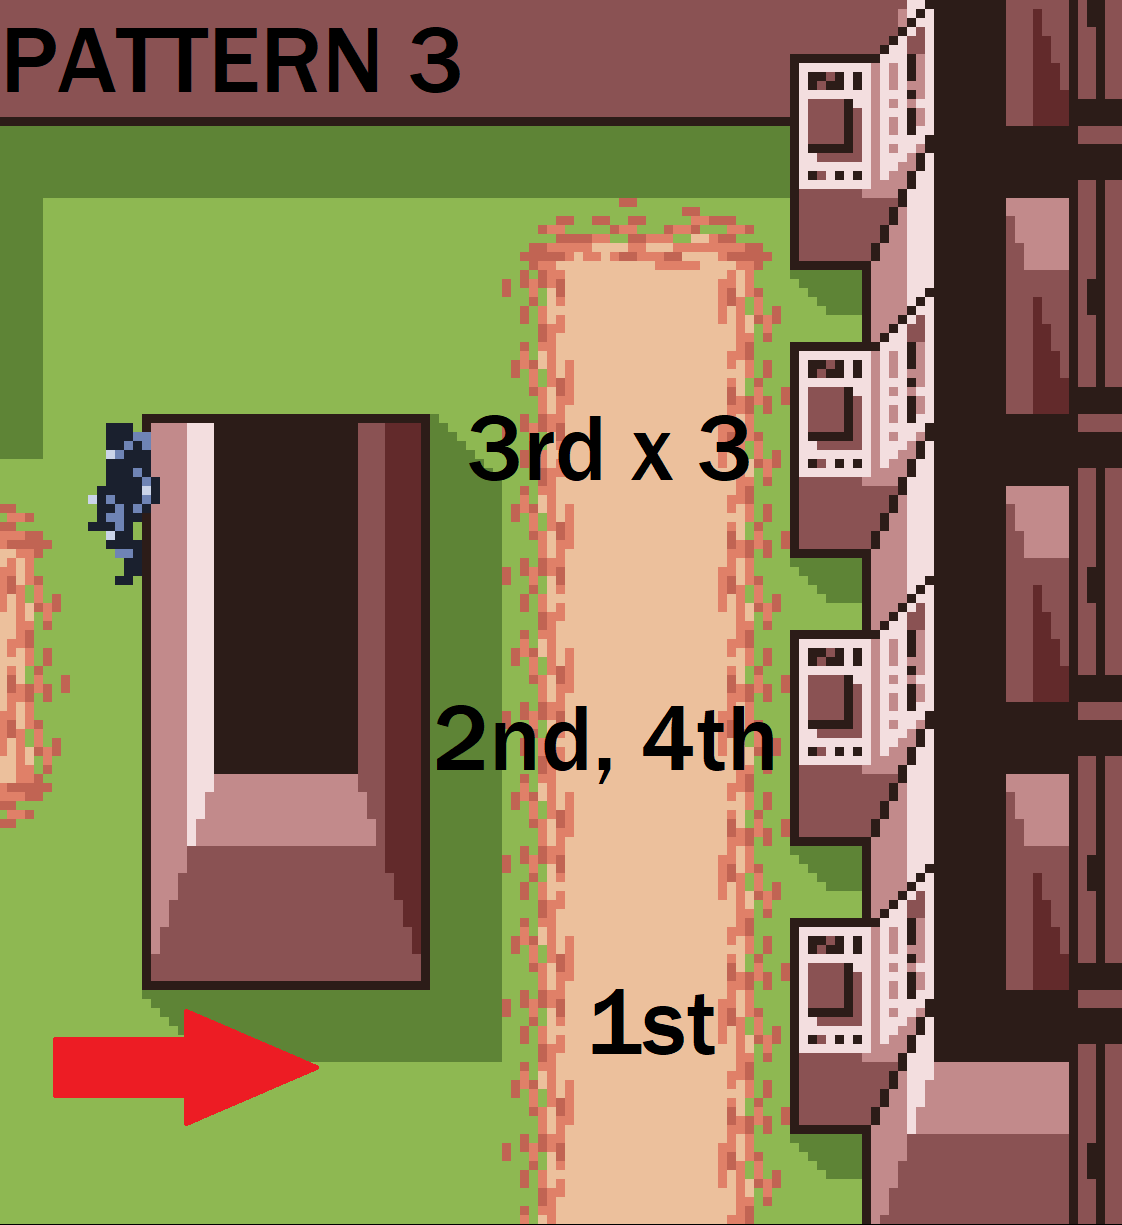
4, 3, 2, 2, 2, and 3 (button order)
Represented in Memory as 3210
| Pattern (Top to Bottom) | Button Order |
|---|---|
| RESET | DON'T PRESS |
| SHIFT | 3rd X3 |
| SOLUTION | 2nd, 4th |
| 1,3,5 | 1st |
(1,3,5 > SOLUTION > SHIFTx3 > SOLUTION)
4th Pattern - Guard Presses Button 4 2031
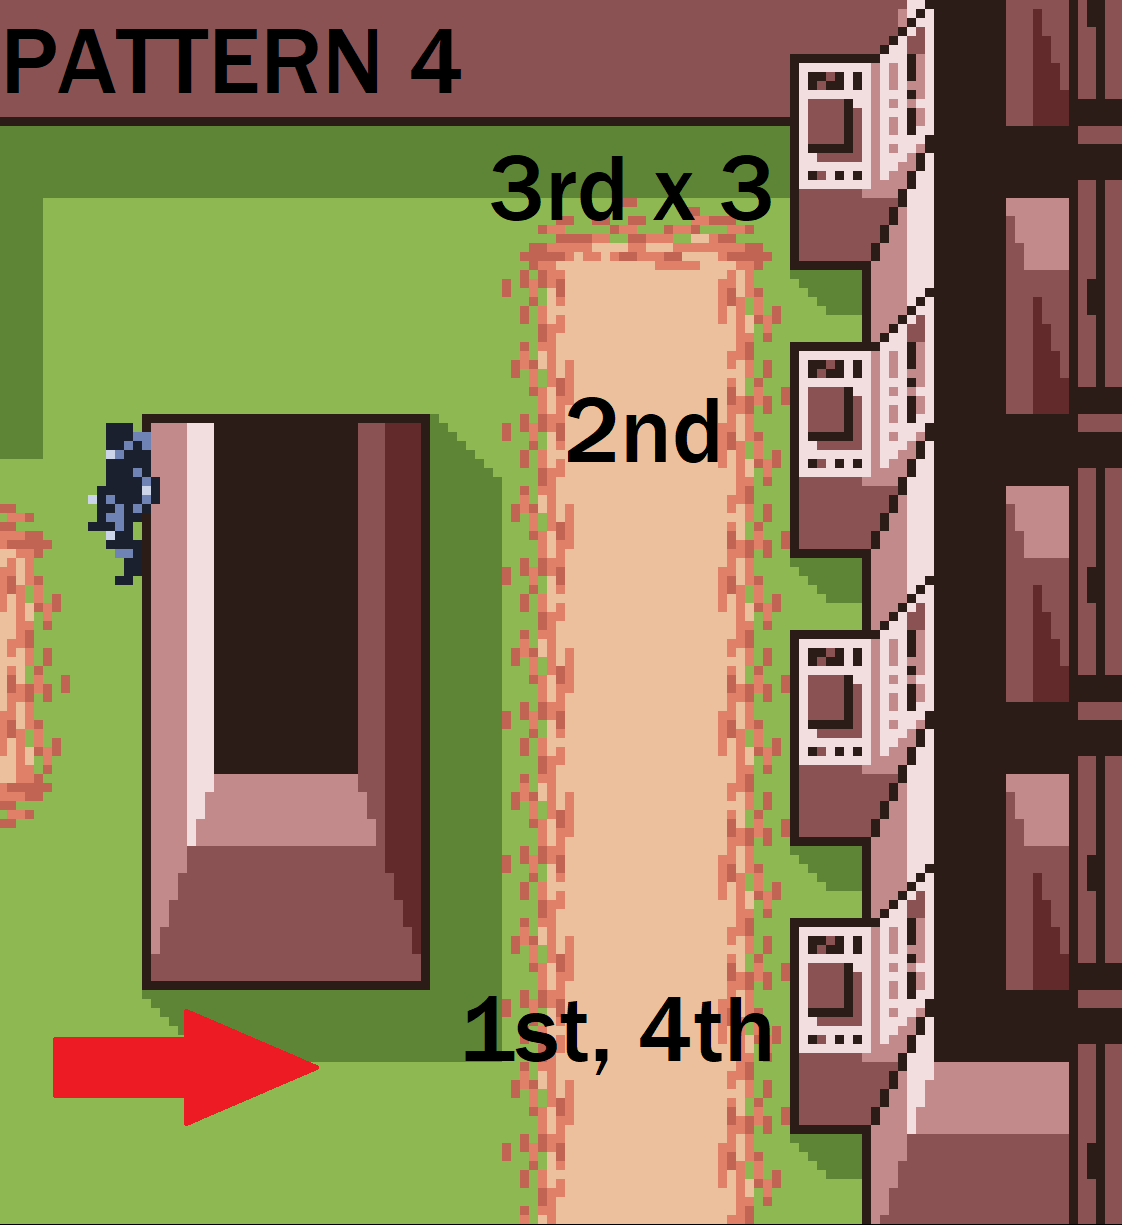
4, 2, 1, 1, 1, and 4 (button order)
Represented in Memory as 2031
| Pattern (Top to Bottom) | Button Order |
|---|---|
| SHIFT | 3rd X3 |
| 1,3,5 | 2nd |
| RESET | DON'T PRESS |
| SOLUTION | 1st, 4th |
(SOLUTION > 1,3,5 > SHIFTx3 > SOLUTION)
Slasher Hawk
- HP: 47
- Takes 4 damage per hit
- 12 hits to kill
- The hawk flies faster than Normal difficulty.
- Red Boomerang travels linearly
- Green Boomerang travels in a zigzag
- Boomerangs always comes back to his right side (your left)
- Hawk swoops in and out of the battlefield, eventually returning to Slasher Hawk
- Slasher Hawk's Invincibility Frames = 2.5
- 0.5 second for grenade throw
- Therefore, count to 2 seconds or 7 flashes - throw grenade